Contribute on GitHub
This guide is for people who want to get involved with Flower, but who are not used to contributing to GitHub projects.
If you’re familiar with how contributing on GitHub works, you can directly checkout our getting started guide for contributors.
Setting up the repository
- Create a GitHub account and setup Git
Git is a distributed version control tool. This allows for an entire codebase’s history to be stored and every developer’s machine. It is a software that will need to be installed on your local machine, you can follow this guide to set it up.
GitHub, itself, is a code hosting platform for version control and collaboration. It allows for everyone to collaborate and work from anywhere on remote repositories.
If you haven’t already, you will need to create an account on GitHub.
The idea behind the generic Git and GitHub workflow boils down to this: you download code from a remote repository on GitHub, make changes locally and keep track of them using Git and then you upload your new history back to GitHub.
- Forking the Flower repository
A fork is a personal copy of a GitHub repository. To create one for Flower, you must navigate to https://github.com/adap/flower (while connected to your GitHub account) and click the
Forkbutton situated on the top right of the page.
You can change the name if you want, but this is not necessary as this version of Flower will be yours and will sit inside your own account (i.e., in your own list of repositories). Once created, you should see on the top left corner that you are looking at your own version of Flower.

- Cloning your forked repository
The next step is to download the forked repository on your machine to be able to make changes to it. On your forked repository page, you should first click on the
Codebutton on the right, this will give you the ability to copy the HTTPS link of the repository.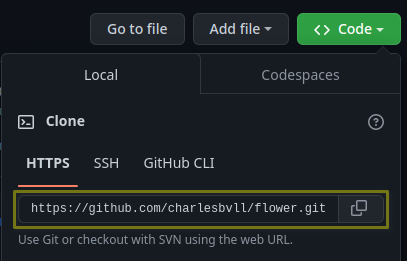
Once you copied the <URL>, you can open a terminal on your machine, navigate to the place you want to download the repository to and type:
$ git clone <URL>
This will create a
flower/(or the name of your fork if you renamed it) folder in the current working directory.
- Add origin
You can then go into the repository folder:
$ cd flower
And here we will need to add an origin to our repository. The origin is the <URL> of the remote fork repository. To obtain it, we can do as previously mentioned by going to our fork repository on our GitHub account and copying the link.

Once the <URL> is copied, we can type the following command in our terminal:
$ git remote add origin <URL>
- Add upstream
Now we will add an upstream address to our repository. Still in the same directory, we must run the following command:
$ git remote add upstream https://github.com/adap/flower.git
The following diagram visually explains what we did in the previous steps:
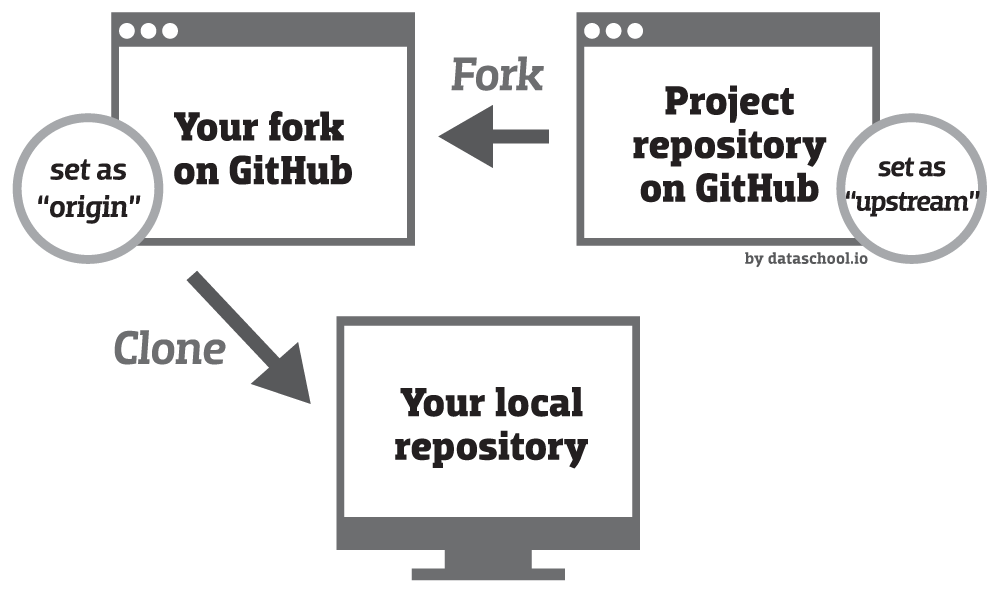
The upstream is the GitHub remote address of the parent repository (in this case Flower), i.e. the one we eventually want to contribute to and therefore need an up-to-date history of. The origin is just the GitHub remote address of the forked repository we created, i.e. the copy (fork) in our own account.
To make sure our local version of the fork is up-to-date with the latest changes from the Flower repository, we can execute the following command:
$ git pull upstream main
Setting up the coding environment
This can be achieved by following this getting started guide for contributors (note that you won’t need to clone the repository). Once you are able to write code and test it, you can finally start making changes!
Making changes
Before making any changes make sure you are up-to-date with your repository:
$ git pull origin main
And with Flower’s repository:
$ git pull upstream main
- Create a new branch
To make the history cleaner and easier to work with, it is good practice to create a new branch for each feature/project that needs to be implemented.
To do so, just run the following command inside the repository’s directory:
$ git switch -c <branch_name>
- Make changes
Write great code and create wonderful changes using your favorite editor!
- Test and format your code
Don’t forget to test and format your code! Otherwise your code won’t be able to be merged into the Flower repository. This is done so the codebase stays consistent and easy to understand.
To do so, we have written a few scripts that you can execute:
$ ./framework/dev/format.sh # to format your code
$ ./framework/dev/test.sh # to test that your code can be accepted
- Stage changes
Before creating a commit that will update your history, you must specify to Git which files it needs to take into account.
This can be done with:
$ git add <path_of_file_to_stage_for_commit>
To check which files have been modified compared to the last version (last commit) and to see which files are staged for commit, you can use the
git
status
command.
- Commit changes
Once you have added all the files you wanted to commit using
git add, you can finally create your commit using this command:$ git commit -m "<commit_message>"
The <commit_message> is there to explain to others what the commit does. It should be written in an imperative style and be concise. An example would be
git commit -m "Add images to README".
- Push the changes to the fork
Once we have committed our changes, we have effectively updated our local history, but GitHub has no way of knowing this unless we push our changes to our origin’s remote address:
$ git push -u origin <branch_name>
Once this is done, you will see on the GitHub that your forked repo was updated with the changes you have made.
Creating and merging a pull request (PR)
- Create the PR
Once you have pushed changes, on the GitHub webpage of your repository you should see the following message:

Otherwise you can always find this option in the
Branchespage.Once you click the
Compare & pull requestbutton, you should see something similar to this: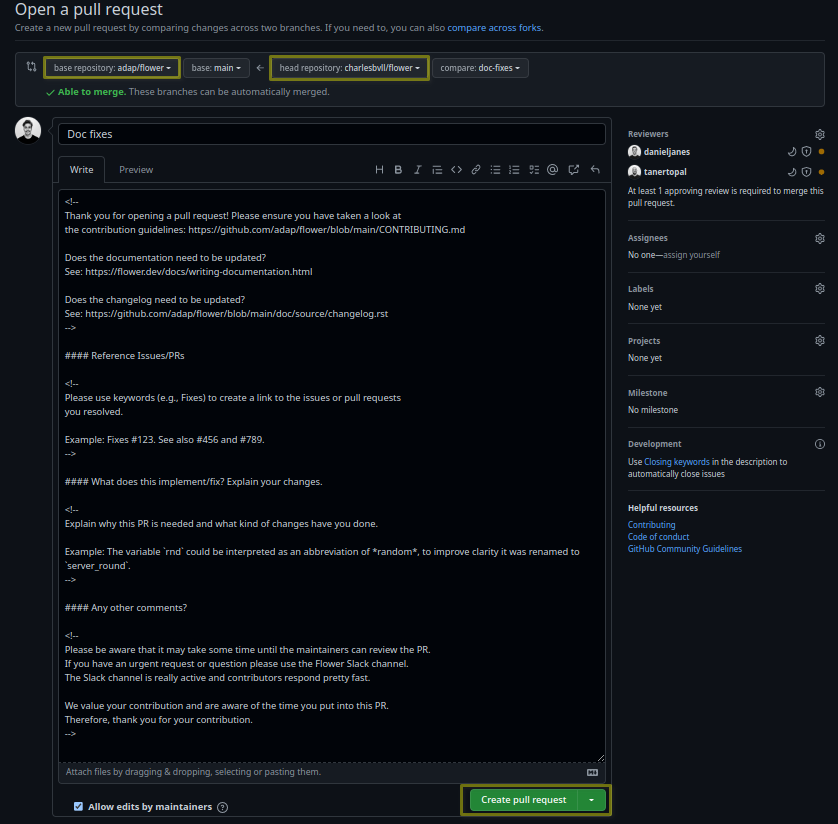
At the top you have an explanation of which branch will be merged where:

In this example you can see that the request is to merge the branch
doc-fixesfrom my forked repository to branchmainfrom the Flower repository.The title should be changed to adhere to the PR title format guidelines, otherwise it won’t be possible to merge the PR. So in this case, a correct title might be
docs(framework:skip) Fix typos.The input box in the middle is there for you to describe what your PR does and to link it to existing issues. We have placed comments (that won’t be rendered once the PR is opened) to guide you through the process.
It is important to follow the instructions described in comments.
At the bottom you will find the button to open the PR. This will notify reviewers that a new PR has been opened and that they should look over it to merge or to request changes.
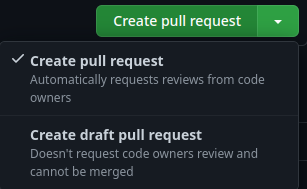
If your PR is not yet ready for review, and you don’t want to notify anyone, you have the option to create a draft pull request:
- Making new changes
Once the PR has been opened (as draft or not), you can still push new commits to it the same way we did before, by making changes to the branch associated with the PR.
- Review the PR
Once the PR has been opened or once the draft PR has been marked as ready, a review from code owners will be automatically requested:
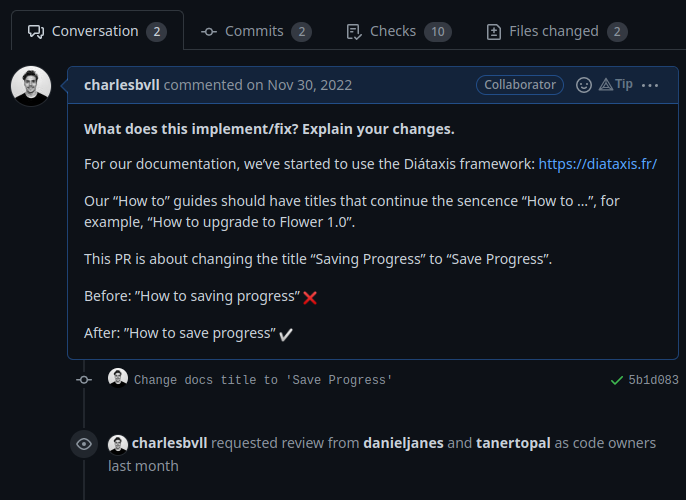
Code owners will then look into the code, ask questions, request changes or validate the PR.
Merging will be blocked if there are ongoing requested changes.
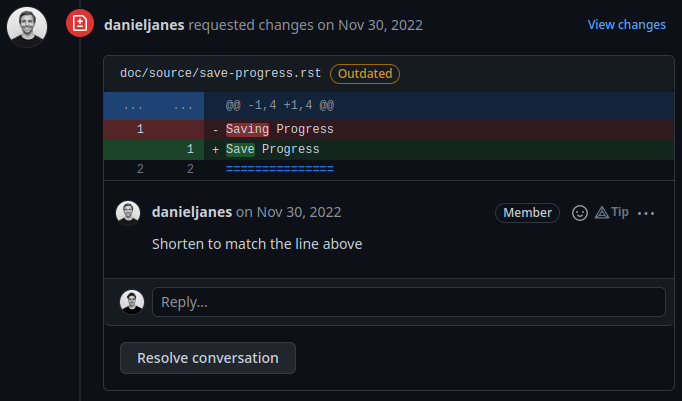
To resolve them, just push the necessary changes to the branch associated with the PR:

And resolve the conversation:
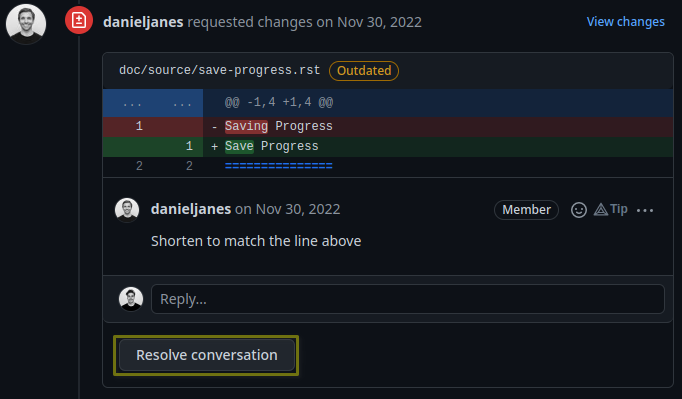
Once all the conversations have been resolved, you can re-request a review.
- Once the PR is merged
If all the automatic tests have passed and reviewers have no more changes to request, they can approve the PR and merge it.
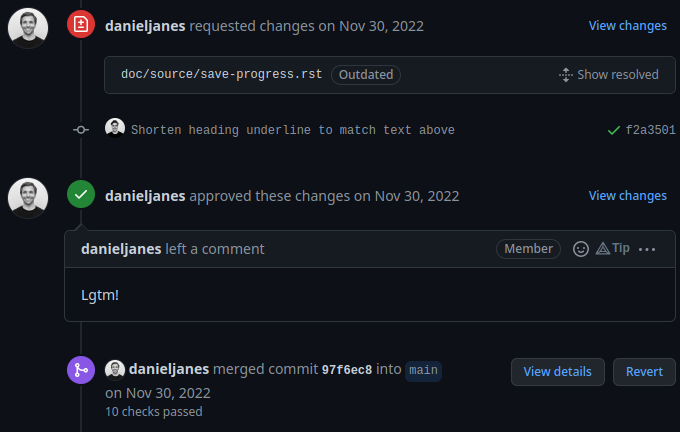
Once it is merged, you can delete the branch on GitHub (a button should appear to do so) and also delete it locally by doing:
$ git switch main
$ git branch -D <branch_name>
Then you should update your forked repository by doing:
$ git pull upstream main # to update the local repository
$ git push origin main # to push the changes to the remote repository
Example of first contribution
Problem
For our documentation, we’ve started to use the Diàtaxis framework.
Our “How to” guides should have titles that continue the sentence “How to …”, for example, “How to upgrade to Flower 1.0”.
Most of our guides do not follow this new format yet, and changing their title is (unfortunately) more involved than one might think.
This issue is about changing the title of a doc from present continuous to present simple.
Let’s take the example of “Saving Progress” which we changed to “Save Progress”. Does this pass our check?
Before: “How to saving progress” ❌
After: “How to save progress” ✅
Solution
This is a tiny change, but it’ll allow us to test your end-to-end setup. After cloning and setting up the Flower repo, here’s what you should do:
Find the source file in
framework/docs/sourceMake the change in the
.rstfile (beware, the dashes under the title should be the same length as the title itself)Build the docs and check the result
Rename file
You might have noticed that the file name still reflects the old wording. If we just change the file, then we break all existing links to it - it is very important to avoid that, breaking links can harm our search engine ranking.
Here’s how to change the file name:
Change the file name to
save-progress.rstAdd a redirect rule to
framework/docs/source/conf.py
This will cause a redirect from saving-progress.html to save-progress.html, old
links will continue to work.
Apply changes in the index file
For the lateral navigation bar to work properly, it is very important to update the
index.rst file as well. This is where we define the whole arborescence of the
navbar.
Find and modify the file name in
index.rst
Open PR
Commit the changes (commit messages are always imperative: “Do something”, in this case “Change …”)
Push the changes to your fork
Open a PR (as shown above) with title
docs(framework) Update how-to guide titleWait for it to be approved!
Congrats! 🥳 You’re now officially a Flower contributor!
Next steps
Once you have made your first PR, and want to contribute more, be sure to check out the following :
Good first contributions, where you should particularly look into the
baselinescontributions.
Appendix
PR title format
We enforce the following PR title format:
<type>(<project>) <subject>
(or <type>(<project>:skip) <subject> to ignore the PR in the changelog)
Where <type> needs to be in {ci, fix, feat, docs, refactor, break},
<project> should be in {framework, baselines, datasets, examples, or '*' when
modifying multiple projects which requires the ':skip' flag to be used}, and
<subject> starts with a capitalised verb in the imperative mood.
Valid examples:
feat(framework) Add flwr build CLI commandrefactor(examples:skip) Improve quickstart-pytorch loggingci(*:skip) Enforce PR title format
Invalid examples:
feat(framework): Add flwr build CLI command(extra:)feat(*) Add flwr build CLI command(missingskipflag along with*)feat(skip) Add flwr build CLI command(missing<project>)feat(framework) add flwr build CLI command(non capitalised verb)feat(framework) Add flwr build CLI command.(dot at the end)Add flwr build CLI command.(missing<type>(<project>))