Run Flower on GCP
A step-by-step guide to learn how to create, deploy and run a Flower app on the Google Cloud Platform (GCP) using the Google Kubernetes Engine (GKE). The figure below presents an overview of the architecture of the Flower components we will deploy on GCP using GKE. In this architecture, ServerApps and ClientApps are executed by the Flower SuperExec (flower-superexec).
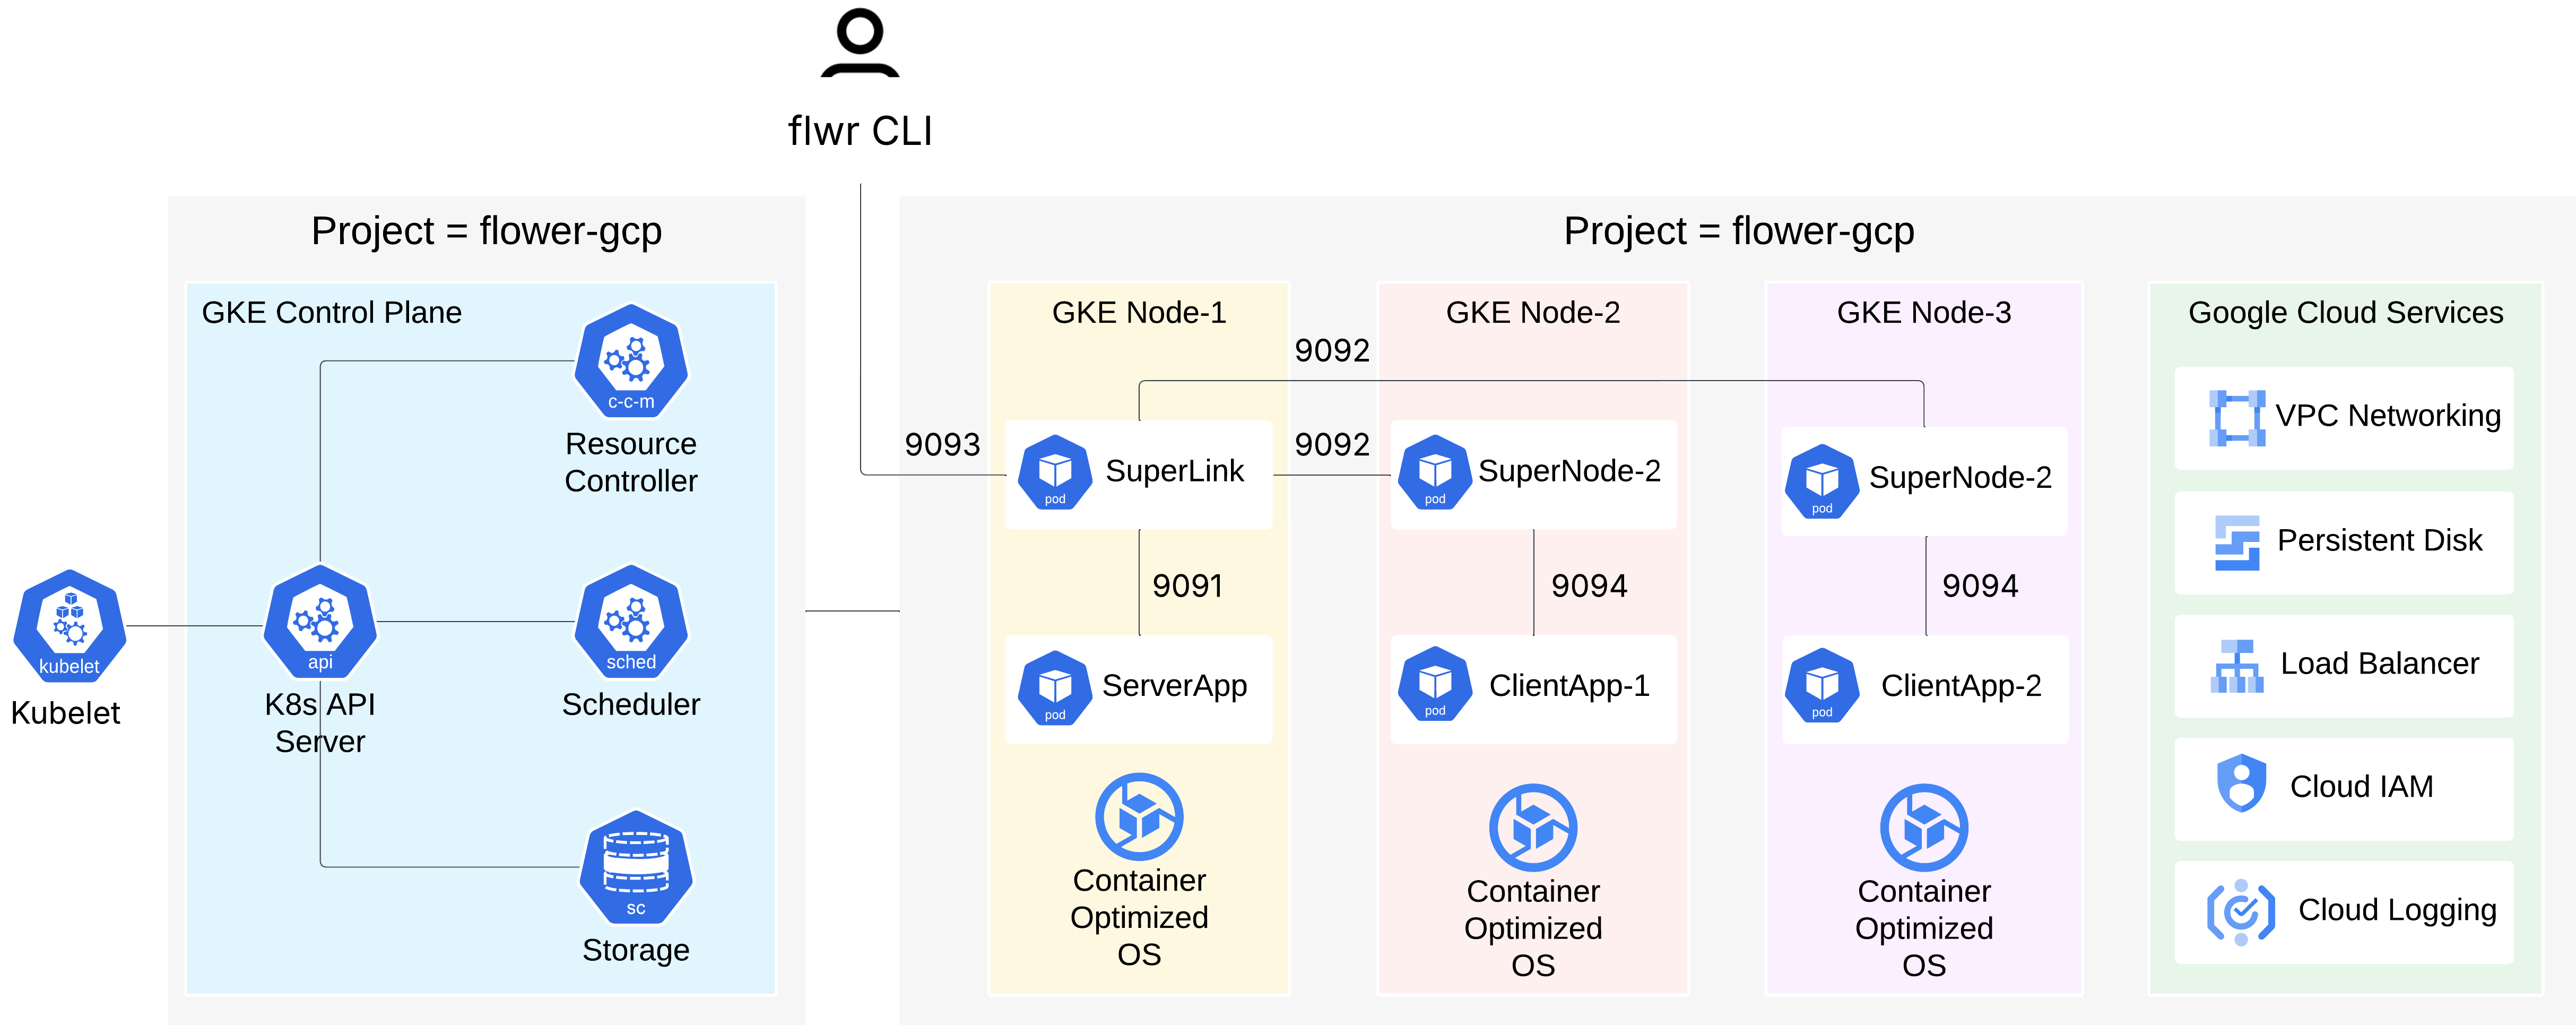
Running Flower on GCP using GKE Architecture.
Part of this guide has also been presented during the Flower AI Summit 2025, by Prashant Kulkarni, GenAI Security Engineer at Google Cloud.
Create a Kubernetes Cluster
Here, we outline the steps to create a Kubernetes cluster in GCP through the GCP user interface. Before proceeding, please make sure you have an account on GCP.
Create GCP Project: Once you have created the account, please create a new project, by selecting the project picker button, i.e., the button with the project name appearing at the top of the page. This will open a new window from where you can press the
NEW PROJECTbutton and create the new project and assign a name, e.g.,flower-gcp. Before proceeding to the next step, please ensure that theflower-gcpproject is selected in the top left corner.Enable Kubernetes API: After the GCP project is created, in the search bar at the top of the GCP page type
Kubernetes Engine APIand click on it (it has anAPIicon). This will redirect you to theKubernetes Engine APIProduct page. From there you need to selectEnable; if you see aBilling requiredpop-up, please check with your administrator to continue, if necessary. After you enable it you should see a green mark in theKubernetes Engine APIsayingAPI Enabled.Create Kubernetes Cluster: in the home page of the GCP project, under the
Productssection, look for the tab calledCreate a Kubernetes Cluster. This will redirect you to a page where you will see an overview of the existing Kubernetes clusters. At the top of the page you should see a button calledCreate cluster. By default, the Kubernetes clusters are deployed using theAutopilotmode. For the current guide, we use theAutopilotmode.Configure Kubernetes Cluster: in the page that is shown, we assign a name to the new cluster, e.g.,
quickstart-numpyand we select the region, e.g.,us-central1. For the rest of the configuration settings, such asCluster Tier,Fleet Registration,Networking, and other settings we use the default values. Now, press theCreatebutton.
Note
Please wait for a couple of minutes until the cluster is ready and fully deployed.
Configure Google Cloud SDK
To interact with our newly deployed Kubernetes cluster, we will use the Google Cloud SDK and configure it locally. This SDK allows us to directly interact with GCP and in turn with our recently deployed Kubernetes cluster.
To install the Google Cloud SDK, we first need to install and configure the gcloud
CLI:
# macOS
curl https://sdk.cloud.google.com | bash  # and then follow on-screen prompts

# macOS (w/ Homebrew)
brew install --cask google-cloud-sdk

# Windows
# Download the Windows installer from the Google Cloud SDK page
# https://dl.google.com/dl/cloudsdk/channels/rapid/GoogleCloudSDKInstaller.exe
# Run the .exe installer and follow the on-screen instructions

# Once the package is installed (e.g., using brew), we initialize gcloud as follows:
gcloud init  # initialize with gcloud init.
gcloud version  # verify installation
Note
For more detailed installation instructions and for installing gcloud for
different operating systems, please take look at the official gcloud CLI
installation page https://cloud.google.com/sdk/docs/install
Once gcloud is installed we need to install kubectl, which is a command-line
tool to interact with Kubernetes clusters:
gcloud components install kubectl
kubectl version --client  # this will show the installed versions of the Client and Kustomize
Before proceeding with the next steps, please make sure that you have an active account
selected, otherwise you will receive a ERROR:
(gcloud.container.clusters.get-credentials) when running the commands below. To obtain
new credentials or select an already authenticated account please run the following
commands
gcloud auth login  # to obtain new credentials
gcloud config set account <ACCOUNT>  # to select an already authenticated <ACCOUNT> that you want to use
Now you need to set the project property in your current workspace using the unique
project identifier, which can be found under the ID column when clicking on the project
picker.
# glocud config set project
gcloud config set project <YOUR_PROJECT_ID>  # <YOUR_PROJECT_ID> is not the project name but the project identifier, e.g., flower-gcp-XXXXXX
Note
The <YOUR_PROJECT_ID> value will be different for each user, e.g., flower-gcp,
flower-gcp-XXXXXX. Its value will be used in subsequent steps, e.g.,
The next step is to configure kubectl to point to the GKE cluster you created in the
previous steps by using the name of the cluster, e.g., quickstart-numpy, and the
name of the region where the cluster was created:
gcloud container clusters get-credentials quickstart-numpy --region us-central1
This will configure the required metadata and fetch the necessary credentials to allow
your local kubectl to communicate with the GKE cluster. To verify that kubectl
was able to connect to the cluster and get the necessary information, you can run the
following command:
kubectl config current-context # this should return the Kubernetes cluster you are connected to
Note
For more information on how kubectl works, please have a look at the following
official quick-reference guide.
Create a Google Artifact Registry
The Google Cloud Artifact Registry is a fully managed, scalable, and private service for
storing and managing software build artifacts and dependencies. Consequently, to run our
Flower app on the GKE cluster, we need to store the app’s specific Flower Docker image
within the registry, i.e., the Flower SuperExec, which we discuss in the next section.
For typical use-cases, the Flower SuperLink and SuperNode Docker images do not need to
be built and can be pulled directly from the official Flower DockerHub repository. This step is crucial as it enables the cluster, and
subsequently the Pods, to download the built Docker images and deploy the necessary
Flower components. Please see below the instructions on how to create the repository
using the gcloud CLI:
# Enable the Artifact Registry API service
gcloud services enable artifactregistry.googleapis.com

# Create the repository
# gcloud artifacts repositories create <YOUR_REPOSITORY_NAME>
gcloud artifacts repositories create flower-gcp-example-artifacts \
    --repository-format=docker \
    --location=us-central1

# Configure Docker to Authenticate with Artifact Registry, e.g.:
#   gcloud auth configure-docker <YOUR_REGION>-docker.pkg.dev
gcloud auth configure-docker us-central1-docker.pkg.dev  # we use us-central1 as our region
Registry Validation & Permissions
The steps below validate that the Google Artifact Registry has been properly configured, you have correct access and you have writing permissions to push the docker images discussed in the next section.
gcloud artifacts repositories list --location=us-central1 # this will list the items under the project with ID <YOUR_PROJECT_ID>
The above command shows that the flower-gcp-example-artifacts repository has been
successfully created under the specified project with ID <YOUR_PROJECT_ID>. Finally,
you need to update your role and assign writing permissions to the artifact registry. To
accomplish this, please run the following command:
gcloud projects add-iam-policy-binding <YOUR_PROJECT_ID> \  # <YOUR_PROJECT_ID> is the ID of the project
    --member="user:<YOUR_EMAIL@DOMAIN.COM>" \
    --role="roles/artifactregistry.writer"
Configure Flower App Docker Images
To proceed with the next step, we first create a local Flower app and then define a dedicated Dockerfile for the Docker image that will run SuperExec. Within SuperExec, either ServerApp or ClientApp will be executed. After building the image, we tag it and push it to the newly created Google registry. Most of the steps on how to build Docker image discussed below are based on the Flower Quickstart with Docker Tutorial.
We create the Flower NumPy app as follows:
# flwr new <APP_ID>[==<APP_VERSION>]
flwr new @flwrlabs/quickstart-numpy
Create Docker Images
With flower-superexec, you do not need to bake your app code into the image.
SuperExec receives and installs the Flower App Bundle (FAB) at runtime inside the
container, keeping your images lightweight.
Note
SuperExec does NOT install dependencies at runtime. If your app requires additional dependencies, make sure they are included in your Docker image, as shown in the Dockerfile example below.
superexec.Dockerfile
# superexec.Dockerfile
FROM flwr/superexec:1.32.0

WORKDIR /app

COPY pyproject.toml .
RUN sed -i 's/.*flwr\[simulation\].*//' pyproject.toml \
   && python -m pip install -U --no-cache-dir .

ENTRYPOINT ["flower-superexec"]
Once we have created the required Dockerfile, we build the Docker Image as follows:
Important
Before running the commands below, make sure Docker is installed and it is up
running. The --platform type is set to linux/amd64, because when using the
Autopilot mode, all Pods in the Kubernetes cluster (by default) are deployed
with an amd64-based architecture.
docker build --platform linux/amd64 -f superexec.Dockerfile -t quickstart_numpy_superexec:0.0.1 .
Tag Docker Images
Before we are able to push our two newly locally created Docker images, we need to tag
them with the Google Artifact Registry repository name and image name we created during
the previous steps. If you have followed the earlier naming suggestions, the repository
name is flower-gcp-example-artifacts, the local Docker image name is
quickstart_numpy_superexec:0.0.1, and the region is us-central1. Please note
that the <YOUR_PROJECT_ID> is different from user to user, so in the commands below
we use the <YOUR_PROJECT_ID> placeholder. Putting all this together, the final
command you need to run to tag the SuperExec Docker image is:
# docker tag YOUR_IMAGE_NAME YOUR_REGION-docker.pkg.dev/YOUR_PROJECT_ID/YOUR_REPOSITORY_NAME/YOUR_IMAGE_NAME:YOUR_TAG

# please change <YOUR_PROJECT_ID> to point to your project identifier
docker tag quickstart_numpy_superexec:0.0.1 us-central1-docker.pkg.dev/<YOUR_PROJECT_ID>/flower-gcp-example-artifacts/quickstart_numpy_superexec:0.0.1
Push Docker Images
Once our image is tagged correctly, you can push it to your Artifact Registry
repository using the docker push command with the tagged name:
# docker push YOUR_REGION-docker.pkg.dev/<YOUR_PROJECT_ID>/YOUR_REPOSITORY_NAME/YOUR_IMAGE_NAME:YOUR_TAG

# please change <YOUR_PROJECT_ID> to point to your project identifier
docker push us-central1-docker.pkg.dev/<YOUR_PROJECT_ID>/flower-gcp-example-artifacts/quickstart_numpy_superexec:0.0.1
Deploy Flower Infrastructure
Before running our Flower app, we first need to deploy our Pods on the Kubernetes
cluster.
In this step, we shall deploy six Pods: 1x SuperLink, 2x SuperNode, 2x
SuperExec(ClientApp), and 1x SuperExec(ServerApp). To achieve this, below we
provide the definition of the six yaml files that are necessary to deploy the
Pods on the cluster and which are passed to kubectl, and a helper
k8s-deploy.sh script, which will deploy the Pods.
superlink-deployment.yaml
apiVersion: apps/v1
kind: Deployment
metadata:
  name: superlink
spec:
  replicas: 1
  selector:
    matchLabels:
      app: superlink
  template:
    metadata:
      labels:
        app: superlink
    spec:
      containers:
      - name: superlink
        image: flwr/superlink:1.32.0
        args:
          - "--insecure"
          - "--isolation"
          - "process"
        ports:  # which ports to expose/available
        - containerPort: 9091
        - containerPort: 9092
        - containerPort: 9093
---
apiVersion: v1
kind: Service
metadata:
  name: superlink-service
spec:
  selector:
    app: superlink
  ports:  # like a dynamic IP routing table/mapping that routes traffic to the designated ports
  - protocol: TCP
    port: 9091   # Port for ServerApp connection
    targetPort: 9091  # the SuperLink container port
    name: superlink-serverappioapi
  - protocol: TCP
    port: 9092   # Port for SuperNode connection
    targetPort: 9092  # the SuperLink container port
    name: superlink-fleetapi
  - protocol: TCP
    port: 9093   # Port for Flower app submission
    targetPort: 9093  # the SuperLink container port
    name: superlink-controlapi
  type: LoadBalancer  # balances workload, makes the service publicly available
supernode-1-deployment.yaml
apiVersion: apps/v1
kind: Deployment
metadata:
  name: supernode-1
spec:
  replicas: 1
  selector:
    matchLabels:
      app: supernode-1
  template:
    metadata:
      labels:
        app: supernode-1
    spec:
      containers:
      - name: supernode
        image: flwr/supernode:1.32.0
        args:
          - "--insecure"
          - "--superlink"
          - "superlink-service:9092"
          - "--clientappio-api-address"
          - "0.0.0.0:9094"
          - "--isolation"
          - "process"
        ports:
        - containerPort: 9094
---
apiVersion: v1
kind: Service
metadata:
  name: supernode-1-service
spec:
  selector:
    app: supernode-1
  ports:
  - protocol: TCP
    port: 9094
    targetPort: 9094
supernode-2-deployment.yaml
apiVersion: apps/v1
kind: Deployment
metadata:
  name: supernode-2
spec:
  replicas: 1
  selector:
    matchLabels:
      app: supernode-2
  template:
    metadata:
      labels:
        app: supernode-2
    spec:
      containers:
      - name: supernode
        image: flwr/supernode:1.32.0
        args:
          - "--insecure"
          - "--superlink"
          - "superlink-service:9092"
          - "--clientappio-api-address"
          - "0.0.0.0:9094"
          - "--isolation"
          - "process"
        ports:
        - containerPort: 9094
---
apiVersion: v1
kind: Service
metadata:
  name: supernode-2-service
spec:
  selector:
    app: supernode-2
  ports:
  - protocol: TCP
    port: 9094
    targetPort: 9094
superexec-serverapp-deployment.yaml
apiVersion: apps/v1
kind: Deployment
metadata:
  name: superexec-serverapp
spec:
  replicas: 1
  selector:
    matchLabels:
      app: superexec-serverapp
  template:
    metadata:
      labels:
        app: superexec-serverapp
    spec:
      containers:
      - name: superexec-serverapp
        # please change <YOUR_PROJECT_ID> to point to your project identifier
        image: us-central1-docker.pkg.dev/<YOUR_PROJECT_ID>/flower-gcp-example-artifacts/quickstart_numpy_superexec:0.0.1
        args:
          - "--insecure"
          - "--appio-api-address"
          - "superlink-service:9091"
          - "--plugin-type"
          - "serverapp"
superexec-clientapp-1-deployment.yaml
apiVersion: apps/v1
kind: Deployment
metadata:
  name: superexec-clientapp-1
spec:
  replicas: 1
  selector:
    matchLabels:
      app: superexec-clientapp-1
  template:
    metadata:
      labels:
        app: superexec-clientapp-1
    spec:
      containers:
      - name: superexec-clientapp
        # please change <YOUR_PROJECT_ID> to point to your project identifier
        image: us-central1-docker.pkg.dev/<YOUR_PROJECT_ID>/flower-gcp-example-artifacts/quickstart_numpy_superexec:0.0.1
        args:
          - "--insecure"
          - "--appio-api-address"
          - "supernode-1-service:9094"
          - "--plugin-type"
          - "clientapp"
superexec-clientapp-2-deployment.yaml
apiVersion: apps/v1
kind: Deployment
metadata:
  name: superexec-clientapp-2
spec:
  replicas: 1
  selector:
    matchLabels:
      app: superexec-clientapp-2
  template:
    metadata:
      labels:
        app: superexec-clientapp-2
    spec:
      containers:
      - name: superexec-clientapp
        # please change <YOUR_PROJECT_ID> to point to your project identifier
        image: us-central1-docker.pkg.dev/<YOUR_PROJECT_ID>/flower-gcp-example-artifacts/quickstart_numpy_superexec:0.0.1
        args:
          - "--insecure"
          - "--appio-api-address"
          - "supernode-2-service:9094"
          - "--plugin-type"
          - "clientapp"
Once you have created the required files, you can use the following k8s-deploy.sh
helper script to deploy all the Pods.
Important
Make sure the Flower version you use to deploy the Pods matches the version of
your Flower app.
k8s-deploy.sh
#! /bin/bash -l

# Change directory to the yaml files directory
cd "$(dirname "${BASH_SOURCE[0]}")"

kubectl apply -f superlink-deployment.yaml
sleep 0.1

kubectl apply -f supernode-1-deployment.yaml
sleep 0.1

kubectl apply -f supernode-2-deployment.yaml
sleep 0.1

kubectl apply -f superexec-serverapp-deployment.yaml
sleep 0.1

kubectl apply -f superexec-clientapp-1-deployment.yaml
sleep 0.1

kubectl apply -f superexec-clientapp-2-deployment.yaml
sleep 0.1
To see that your Pods are deployed, please go to the Navigation Menu on the
Google Console, select Kubernetes Engine and then the Workloads page. The new
window that appears will show the status of the Pods under deployment.
Caution
Please wait for a couple of minutes (3’ to 5’ minutes should be enough) before the
Pods are up and running. While Pods resources are being provisioned, some
warnings are expected.
Run Flower App
Once all Pods are up and running, we need to get the EXTERNAL_IP of the
superlink-service and point our Flower app to use the Kubernetes cluster to submit
and execute the job.
To get the EXTERNAL-IP of the superlink-service we run the following command,
which will show the NAME, TYPE, CLUSTER-IP, EXTERNAL-IP and PORTS of
the service:
kubectl get service superlink-service
After we get the EXTERNAL-IP we need to create a new SuperLink connection in the
Flower Configuration file:
Run
flwr config listto locate the Flower configuration file on your machine and view available SuperLink connections.$ flwr config list Flower Config file: /path/to/.flwr/config.toml SuperLink connections: supergrid local (default)
Open the Flower Configuration file (
config.toml) and add a new SuperLink connection at the end:config.toml¶[superlink.gcp-deployment] address = "<EXTERNAL_IP>:9093" # replace the EXTERNAL_IP with the correct value insecure = true
Then we can execute the example on the GCP cluster by running:
flwr run . gcp-deployment --stream
Note
Please note that in the current deployment, communication is not encrypted. To enable TLS for secure connections, check the following guide. We will also be updating the current guide soon with more details on how to configure TLS.
If the job is successfully submitted, and executed, then in your console you should see the logs from the run. The output should look like the one shared below.
Expected Output
Loading project configuration...
Success
🎊 Successfully built flower.quickstart-numpy.1-0-0.ba270a25.fab
🎊 Successfully started run 2796207907461390277
INFO :      Starting logstream for run_id `2796207907461390277`
INFO :      Start `flwr-serverapp` process
🎊 Successfully installed quickstart-numpy to /app/.flwr/apps/flower.quickstart-numpy.1.0.0.ba270a25.
INFO :      Starting FedAvg strategy:
INFO :          ├── Number of rounds: 3
INFO :          ├── ArrayRecord (0.00 MB)
INFO :          ├── ConfigRecord (train): (empty!)
INFO :          ├── ConfigRecord (evaluate): (empty!)
INFO :          ├──> Sampling:
INFO :          │       ├──Fraction: train (1.00) | evaluate ( 1.00)
INFO :          │       ├──Minimum nodes: train (2) | evaluate (2)
INFO :          │       └──Minimum available nodes: 2
INFO :          └──> Keys in records:
INFO :                  ├── Weighted by: 'num-examples'
INFO :                  ├── ArrayRecord key: 'arrays'
INFO :                  └── ConfigRecord key: 'config'
INFO :
INFO :
INFO :      [ROUND 1/3]
INFO :      configure_train: Sampled 2 nodes (out of 2)
INFO :      aggregate_train: Received 2 results and 0 failures
INFO :          └──> Aggregated MetricRecord: {'random_metric': 0.6692931409515264}
INFO :      configure_evaluate: Sampled 2 nodes (out of 2)
INFO :      aggregate_evaluate: Received 2 results and 0 failures
INFO :          └──> Aggregated MetricRecord: {'random_metric': [0.4880010858339962, 0.3087008997447846, 0.6336219116058434]}
INFO :
INFO :      [ROUND 2/3]
INFO :      configure_train: Sampled 2 nodes (out of 2)
INFO :      aggregate_train: Received 2 results and 0 failures
INFO :          └──> Aggregated MetricRecord: {'random_metric': 0.5360441357065859}
INFO :      configure_evaluate: Sampled 2 nodes (out of 2)
INFO :      aggregate_evaluate: Received 2 results and 0 failures
INFO :          └──> Aggregated MetricRecord: {'random_metric': [0.25413977771677904, 0.33788546118090673, 0.64626655554784]}
INFO :
INFO :      [ROUND 3/3]
INFO :      configure_train: Sampled 2 nodes (out of 2)
INFO :      aggregate_train: Received 2 results and 0 failures
INFO :          └──> Aggregated MetricRecord: {'random_metric': 0.04090013167984635}
INFO :      configure_evaluate: Sampled 2 nodes (out of 2)
INFO :      aggregate_evaluate: Received 2 results and 0 failures
INFO :          └──> Aggregated MetricRecord: {'random_metric': [0.7990976665955934, 0.20095453623327086, 0.6090265112641057]}
INFO :
INFO :      Strategy execution finished in 14.66s
INFO :
INFO :      Final results:
INFO :
INFO :          Global Arrays:
INFO :                  ArrayRecord (0.000 MB)
INFO :
INFO :          Aggregated ClientApp-side Train Metrics:
INFO :          { 1: {'random_metric': '6.6929e-01'},
INFO :            2: {'random_metric': '5.3604e-01'},
INFO :            3: {'random_metric': '4.0900e-02'}}
INFO :
INFO :          Aggregated ClientApp-side Evaluate Metrics:
INFO :          { 1: {'random_metric': "['4.8800e-01', '3.0870e-01', '6.3362e-01']"},
INFO :            2: {'random_metric': "['2.5414e-01', '3.3789e-01', '6.4627e-01']"},
INFO :            3: {'random_metric': "['7.9910e-01', '2.0095e-01', '6.0903e-01']"}}
INFO :
INFO :          ServerApp-side Evaluate Metrics:
INFO :          {}
INFO :
Note
Please note that if you terminate or shut down the cluster, and create a new one,
the value of the EXTERNAL_IP changes. In that case, you will have to update the
Flower Configuration file.
Shutdown Flower Infrastructure
If you would like to shutdown all the running pods deployed during this guide, you can
use the kubectl delete command and pass the the .yaml file of each pod, as also
shown in the helper script below.
k8s-shutdown.sh
#! /bin/bash -l

# Change directory to the yaml files directory
cd "$(dirname "${BASH_SOURCE[0]}")"

kubectl delete -f superlink-deployment.yaml
sleep 0.1

kubectl delete -f supernode-1-deployment.yaml
sleep 0.1

kubectl delete -f supernode-2-deployment.yaml
sleep 0.1

kubectl delete -f superexec-serverapp-deployment.yaml
sleep 0.1

kubectl delete -f superexec-clientapp-1-deployment.yaml
sleep 0.1

kubectl delete -f superexec-clientapp-2-deployment.yaml
sleep 0.1