Federated AI with Embedded Devices using Flower

This example will show you how Flower makes it very easy to run Federated Learning workloads on edge devices. Here we’ll be showing how to use Raspberry Pi as Flower clients, or better said, SuperNodes. The FL workload (i.e. model, dataset and training loop) is mostly borrowed from the quickstart-pytorch example, but you could adjust it to follow quickstart-tensorflow if you prefere using TensorFlow. The main difference compare to those examples is that here you’ll learn how to use Flower’s Deployment Engine to run FL across multiple embedded devices.
Getting things ready
[!NOTE] This example is designed for beginners that know a bit about Flower and/or ML but that are less familiar with embedded devices. If you already have a couple of devices up and running, clone this example and start the Flower clients after launching the Flower server.
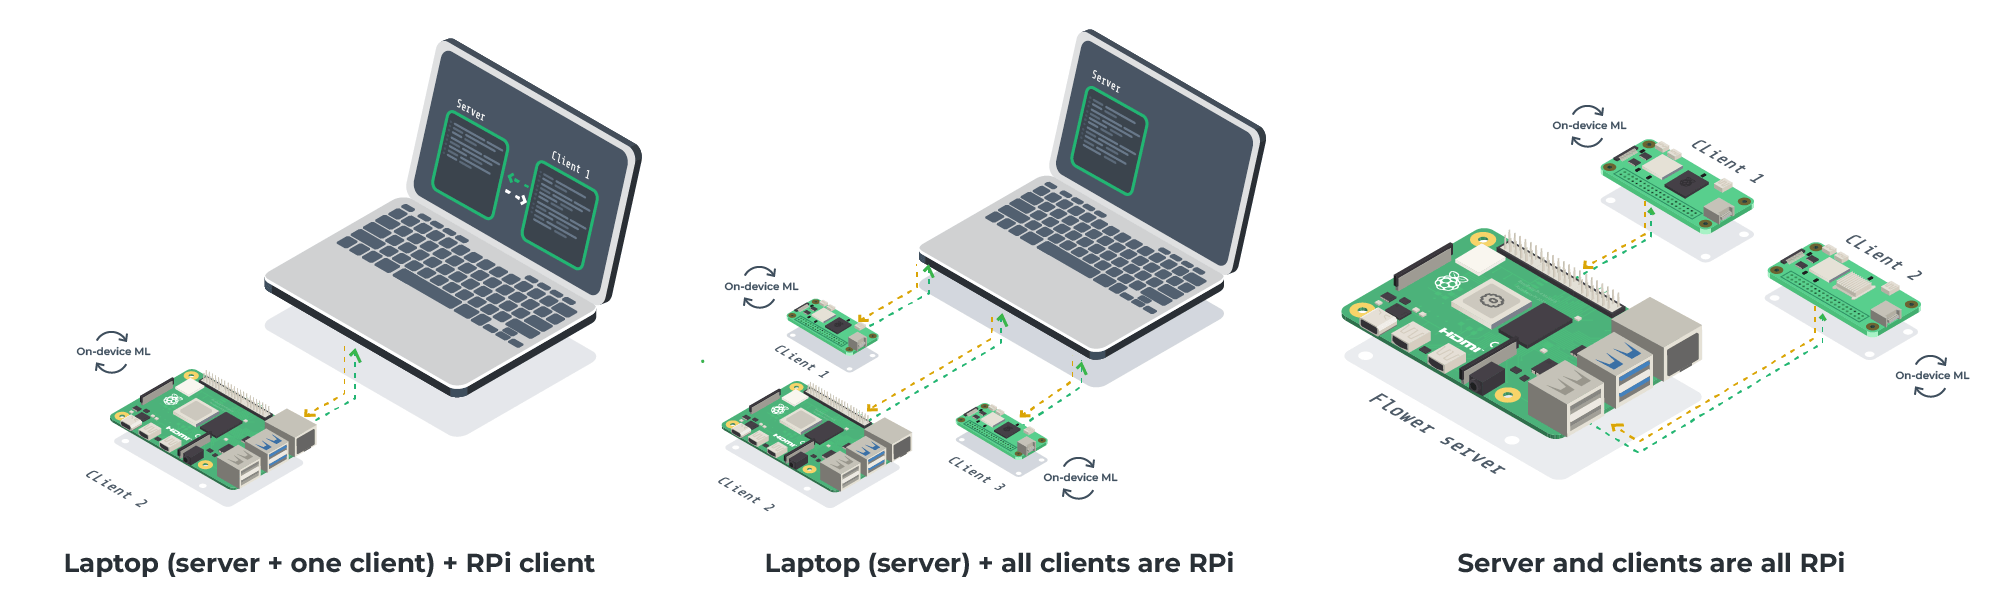
This tutorial allows for a variety of settings (some shown in the diagrams above). As long as you have access to one embedded device, you can follow along. This is a list of components that you’ll need:
For Flower server: A machine running Linux/macOS (e.g. your laptop). You can run the server on an embedded device too!
For Flower clients (one or more): Raspberry Pi 5 or 4 (or Zero 2), or anything similar to these.
A uSD card with 32GB or more.
Software to flash the images to a uSD card:
For Raspberry Pi we recommend the Raspberry Pi Imager
For other devices balenaEtcher it’s a great option.
What follows is a step-by-step guide on how to setup your client/s and the server.
Clone this example
[!NOTE] Cloning the example and installing the project is only needed for the machine that’s going to start the run. The embedded devices would typically run a Flower
SuperNodefor which onlyflwrand relevant libraries needed to run theClientApp(more on this later) are needed.
Start with cloning this example on your laptop or desktop machine. We have prepared a single line which you can copy and execute:
git clone --depth=1 https://github.com/flwrlabs/flower.git \
          && mv flower/examples/embedded-devices . \
          && rm -rf flower && cd embedded-devices
This will create a new directory called embedded-devices with the following structure:
embedded-devices
├── embeddedexample
│   ├── __init__.py
│   ├── client_app.py   # Defines your ClientApp
│   ├── server_app.py   # Defines your ServerApp
│   └── task.py         # Defines your model, training and data loading
├── pyproject.toml      # Project metadata like dependencies and configs
└── README.md
Install the dependencies defined in pyproject.toml as well as the embeddedexample package.
pip install -e .
Setting up a Raspberry Pi
[!TIP] This steps walk you through the process of setting up a Rapsberry Pi. If you have one already running and you have a Python environment with
flwrinstalled already, you can skip this section entirely. Taking a quick look at the Embedded Devices Setup page might be useful.
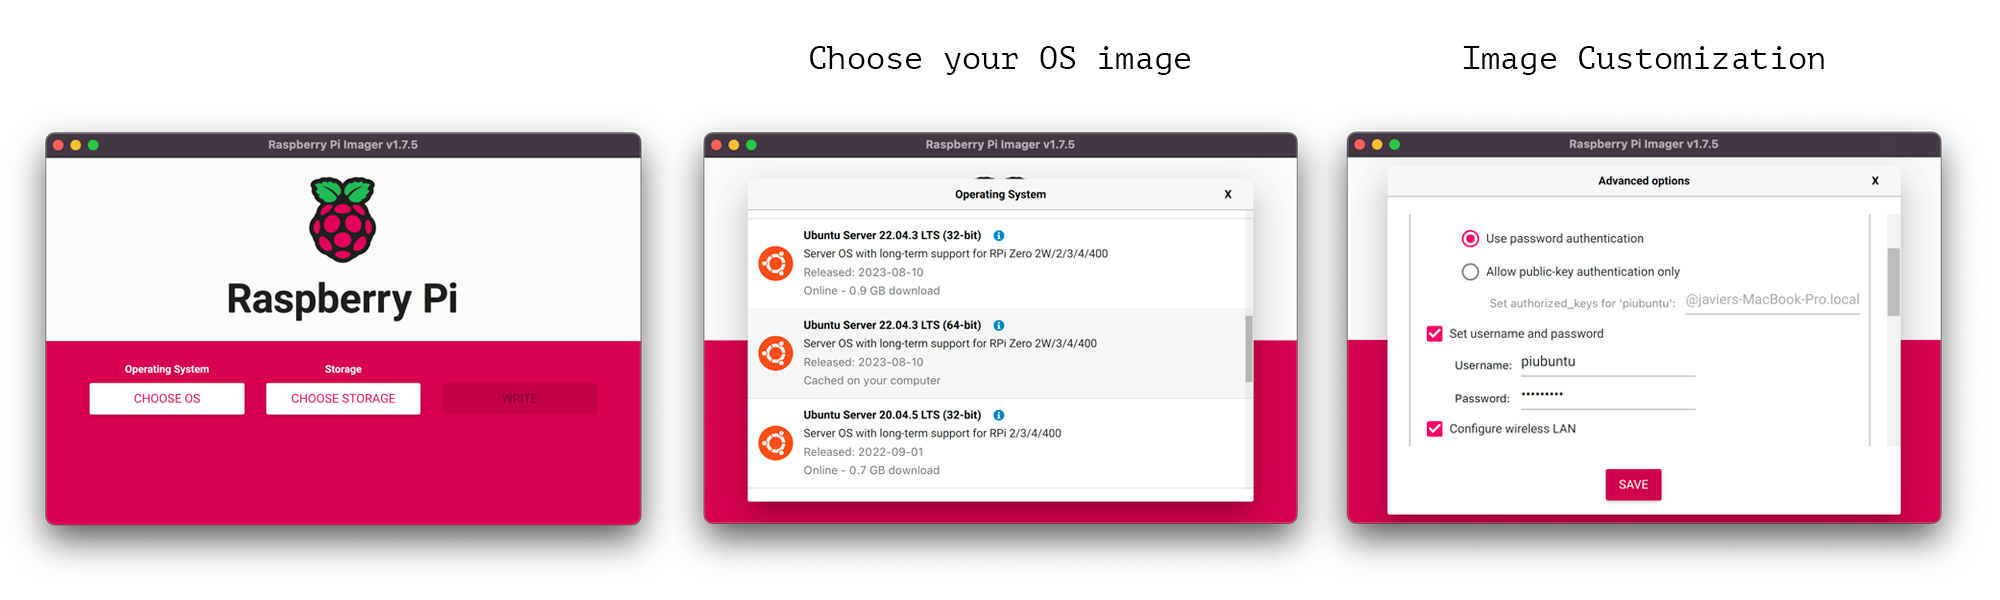
Installing Ubuntu server on your Raspberry Pi is easy with the Raspberry Pi Imager. Before starting ensure you have a uSD card attached to your PC/Laptop and that it has sufficient space (ideally larger than 16GB). Then:
Click on
CHOOSE OS>Raspberry Pi OS (other)>Raspberry Pi OS Lite (64-bit). Other versions ofRaspberry Pi OSor evenUbuntu Serverwould likely work but try to use a64-bitone.Select the uSD you want to flash the OS onto. (This will be the uSD you insert in your Raspberry Pi)
After selecting your storage, click on
Next. Then, you’ll be asked if you want to edit the settings of the image you are about to flash. This allows you to setup a custom username and password as well as indicate to which WiFi network your device should connect to. In the screenshot you can see some dummy values. This tutorial doesn’t make any assumptions on these values, set them according to your needs.Finally, complete the remaining steps to start flashing the chosen OS onto the uSD card.
Preparations for your Flower experiments
SSH into your Rapsberry Pi.
Follow the steps outlined in Embedded Devices Setup to set it up for develpment. The objetive of this step is to have your Pi ready to join later as a Flower
SuperNodeto an existing federation.
Run your Flower experiments following the steps in the Running FL with Flower section.
Embedded Federated AI
[!TIP] Follow this how-to guide to learn more about Flower’s Deployment Engine, how setting up secure TLS-enabled communications and SuperNode authentication works. If you are already familiar with how the Deployment Engine works, you may want to learn how to run this same example using Docker. Check out the Flower with Docker documentation.
For this demo, we’ll be using Fashion-MNIST, a popular dataset for image classification comprised of 10 classes (e.g. boot, dress, trouser) and a total of 70K 28x28 greyscale images. The training set contains 60K images.
[!TIP] Refer to the Flower Architecture page for an overview of the different components involved in a federation.
Ensure your embedded devices have some data
Unless your devices already have some images that could be used to train a small CNN, we need to send a partition of the Fashion-MNIST dataset to each device that will run as a SuperNode. You can make use of the generate_dataset.py script to partition the Fashion-MNIST into N disjoint partitions that can be then given to each device in the federation.
# Partition the Fashion-MNIST dataset into two partitions
python generate_dataset.py --num-supernodes=2
The above command will create two subdirectories in ./datasets, one for each partition. Next, copy those dataset over to your devices. You can use scp for this. Like shown below. Repeat for all your devices.
# Copy one partition to a device
scp -r datasets/fashionmnist_part_1 <user>@<device-ip>:/path/to/home
Launching the Flower SuperLink
On your development machine, launch the SuperLink. You will connnect Flower SuperNodes to it in the next step.
flower-superlink --insecure
Connecting Flower SuperNodes
With the SuperLink up and running, we can now launch a SuperNode on each embedded device. To do this, make sure you know the IP address of the machine running the SuperLink and that the necessary data has been copied to the device.
When using --node-config, note that we set a key named dataset-path. This key is required by the ClientApp defined in client_app.py. The configuration file will be automatically delivered to the SuperNode, ensuring it can execute the ClientApp logic correctly.
[!NOTE] You don’t need to clone this example to your embedded devices running as Flower
SuperNodes. The code they will execute (in embeddedexamples/client_app.py) will automatically be delivered.
Ensure the Python environment you created earlier when setting up your device has all dependencies installed. For this example you’ll need the following:
# After activating your environment
pip install -U flwr
pip install torch torchvision datasets
Now, launch your SuperNode pointing it to the dataset you scp-ed earlier:
# Repeat for each embedded device (adjust SuperLink IP and dataset-path)
flower-supernode --insecure --superlink="SUPERLINK_IP:9092" \
                 --node-config="dataset-path='path/to/fashionmnist_part_1'"
Repeat for each embedded device that you want to connect to the SuperLink.
Run the Flower App
With both the long-running server (SuperLink) and two SuperNodes up and running, we can now start run. Let’s first update the Flower Configuration file to add a new SuperLink connection.
Locate your Flower configuration file by running:
flwr config list
# Example output:
Flower Config file: /path/to/your/.flwr/config.toml
SuperLink connections:
 supergrid
 local (default)
Open this configuration file and add a new SuperLink connection at the end:
[superlink.embedded-federation]
address = "127.0.0.1:9093" # ControlAPI of your SUPERLINK
insecure = true
Finally, run your Flower App in your federation:
flwr run . embedded-federation
[!TIP] For more details about how to create a SuperLink connection please refer to the How-To use Flower’s Deployment Engine guide. Read more about the Flower Configuration file in this guide.