On-device Federated Finetuning for Speech Classification

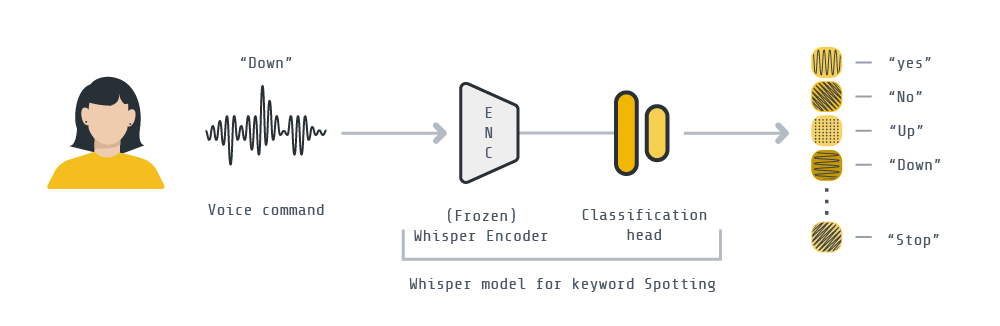
This example demonstrates how to, from a pre-trained Whisper model, finetune it for the downstream task of keyword spotting. We’ll be implementing a federated downstream finetuning pipeline using Flower involving a total of 100 clients. As for the downstream dataset, we’ll be using the Google Speech Commands dataset for keyword spotting. We’ll take the encoder part of the Whisper-tiny model, freeze its parameters, and learn a lightweight classification (<800K parameters !!) head to correctly classify a spoken word.
This example can be run in three modes:
Centralized training: the standard way of training ML models, where all the data is available to the node doing the finetuning.
Federated Learning: the better way of doing ML, where a model is finetuned collaboratively by nodes (i.e. clients), each using their own data. These clients can run:
in simulation mode: a client is an ephemeral Python process with a portion of the system resources assigned to it.
in on-device mode: clients are detached entities and each can run on a different device.
Set up the project
Clone the project
Start by cloning the example project:
git clone --depth=1 https://github.com/flwrlabs/flower.git _tmp \
        && mv _tmp/examples/whisper-federated-finetuning  . \
        && rm -rf _tmp \
        && cd whisper-federated-finetuning
This will create a new directory called whisper-federated-finetuning containing the following files:
whisper-federated-finetuning
├── whisper_example
│   ├── __init__.py
│   ├── client_app.py   # Defines your ClientApp
│   ├── server_app.py   # Defines your ServerApp
│   ├── model.py        # Defines the model and training functions
│   └── dataset.py      # Defines your dataset and its processing
├── centralized.py      # Centralized version of this example
├── preprocess.py       # A utility script to preprocess all partitions
├── pyproject.toml      # Project metadata like dependencies and configs
└── README.md
[!NOTE] This example can be run in different ways, please refer to the corresponding section for further instructions.
Install dependencies and project
In a new Python environment, install the dependencies defined in pyproject.toml as well as the whisper_example package.
pip install -e .
Centralized Training
[!TIP] This section describes how to finetune
Whisper-tinyfor keyword spotting without making use of Federated Learning. This means that the whole training set is available at any point and therefore it is in its entirety to finetune the model each epoch. Skip to the next section if you want to jump straight into how to runWhisper-tinywith Flower!
Then run centralized training as follows. Please note that the first time you run the code, the SpeechCommnads dataset will be downloaded and pre-processed using 🤗 API (which takes a little while – approx 40min – and is cached in ~/.cache/huggingface/datasets/speechcommands wiht a footprint of ~83GB). Subsequent runs shouldn’t require this preprocessing.
python centralized.py --compile # don't use `--compile` flag if you are using pytorch < 2.0

# The script will save a checkpoint of the classifier head after each epoch
# These checkpoints followo the naming style: `classifier_<val_accuracy>.pt`

# You can load a checkpoint by passing it like this:
python centralized.py --checkpoint <my_checkpoint>.pt
Within 2 epochs you should see a validation accuracy of over 95%. On an RTX 3090Ti each epoch takes ~3min30sec. The final test set consistently reaches 97%+. Below is the log you should expect to see:
...
classifier_head_params = 781964
Initial (loss, acc): loss = 0.04124763025785586, accuracy = 0.03215788419154478
Epoch: 0
100%|████████████████████████| 84928/84928 [03:05<00:00, 456.93it/s, avg_loss=0.7269, avg_acc=0.8282]
VALIDATION ---> loss = 0.0051703976778501234, accuracy = 0.9319775596072931
Epoch: 1
100%|████████████████████████| 84928/84928 [03:07<00:00, 454.06it/s, avg_loss=0.1588, avg_acc=0.9629]
VALIDATION ---> loss = 0.003613288299632327, accuracy = 0.943097575636145
Epoch: 2
100%|████████████████████████| 84928/84928 [03:06<00:00, 454.16it/s, avg_loss=0.1208, avg_acc=0.9675]
VALIDATION ---> loss = 0.0022978041400064466, accuracy = 0.9610298537367261
Training done...
Evaluating test set. Loading best model
TEST ---> loss = 0.001703281509680464, accuracy = 0.9740286298568507
Run the project
Centralized training is ok but in many settings it cannot be realised. Primarily because the training data must remain distributed (i.e. on the client side) and cannot be aggregated into a single node (e.g. your server). With Flower we can easily design a federated finetuning pipeline by which clients locally train the classification head on their data, before communicating it to a central server. There, the updates sent by the clients get aggregated and re-distributed among clients for another round of FL. This process is repeated until convergence. Note that, unlike the encoder part of the Whisper model, the classification head is incredibly lightweight (just 780K parameters), adding little communication costs as a result.
There are a total of 2112 speakers in the train partition, which is the one we’ll use in FL.
from datasets import load_dataset
sc_train = load_dataset("speech_commands", "v0.02", split="train", token=False)
print(sc_train)
# Dataset({
#     features: ['file', 'audio', 'label', 'is_unknown', 'speaker_id', 'utterance_id'],
#     num_rows: 84848
# })

# The training set is comprised of ~85K 1-second audio clips from 2112 individual speakers
ids = set(sc_train['speaker_id'])
print(len(ids))
# 2113  # <--- +1 since a "None" speaker is included (for clips to construct the _silence_ training examples)
In this example, we use the GroupedNaturalIdPartitioner from Flower Datasets to partition the SpeepCommands dataset based on speaker_id. We will create groups of 5 speakers, this will result in a total of 422 groups, each representing a node/client in the federation.. Each speaker_id is only present in a single group. You can think of each group as an individual Federated Learning node that contains several users/speakers. One way to think about this is to view each client as an office with several people working there, each interacting with the Keyword spotting system.
The resulting data partitions are not equal-sized (which is what you’d often find in practice in the real world) because not all speaker_id contributed the same amount of audio clips when the Speech Commands Dataset was created. If we make a bar plot showing the amount of data each client/node has this is the result.
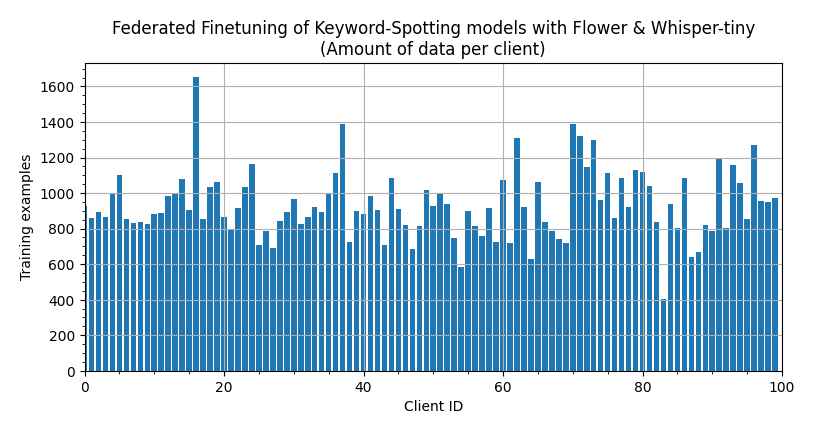
[!NOTE] You can make create this plot or adjust it by running the visualize_labels notebook. It makes use of Flower Dataset’s visualization tools.
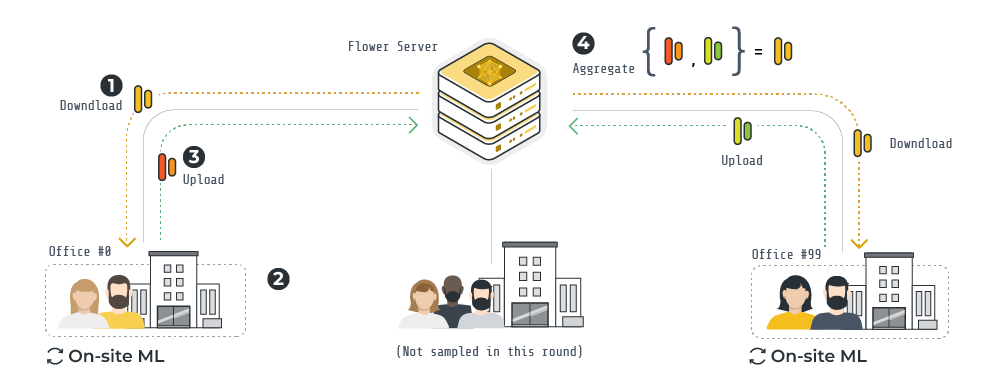
An overview of the FL pipeline built with Flower for this example is illustrated above.
At the start of a round, the
ServerAppcommunicates the weights of classification head to a fraction of the nodes.The
ClientAppin each node, using a frozen pre-trained Whisper encoder, trains the classification head using its own data samples.Once on-site training is completed, each node sends back the (now updated) classification head to the
ServerApp.The Flower
ServerAppaggregates (via FedAvg – but you can choose any other strategy, or implement your own!) the classification heads in order to obtain a new global classification head. This head will be shared with nodes in the next round.
You can run your Flower project in both simulation and deployment mode without making changes to the code. If you are starting with Flower, we recommend you using the simulation mode as it requires fewer components to be launched manually. By default, flwr run will make use of the Simulation Engine.
Run with the Simulation Engine
The run is defined in the pyproject.toml which: specifies the paths to ClientApp and ServerApp as well as their parameterization with configs in the [tool.flwr.app.config] block.
This example is designed to run with 422 virtual SuperNodes. This is the result of grouping all 2112 speakers into groups of 5. First we need to change the configuration of the Simulation Runtime (which by default uses 10 nodes). This guide assumes your default SuperLink connection points to one ready for simulations. If you aren’t sure, please refer to the How-to run Flower locally guide.
flwr federation simulation-config \
    --num-supernodes=422 \
    --client-resources-num-cpus=4 \
    --init-args-log-to-driver=false # set to true to enable all logs from simulation engine
[!NOTE] By default, it will run on CPU only. On a MacBook Pro M2, running 3 rounds of Flower FL should take ~10 min. Assuming the dataset has already been downloaded. Running on GPU is recommended. Read more about how Flower Simulations work and how to make them use the GPU in the documentation.
# Run with default settings (21 clients per round out of 422)
flwr run . --stream
You can expect a summary at the end showing federated metrics (i.e. the average training accuracy and loss across clients sampled in a round) looking like this:
INFO :      [SUMMARY]
INFO :      Run finished 3 round(s) in 564.50s
INFO :          History (metrics, distributed, fit):
INFO :          {'train_accuracy': [(1, 0.637721849625075),
INFO :                              (2, 0.8666815319504736),
INFO :                              (3, 0.8912498749526644)],
INFO :           'train_loss': [(1, 4.049714171341712),
INFO :                          (2, 1.8473016127565092),
INFO :                          (3, 2.5116721350250693)]}
INFO :
To run your ClientApps on GPU, you’ll need to define a new SuperLink connection in your Flower Configuration file that assigns GPU resources to your virtual clients. Check how to do this in the Flower Simulation documentation.
You can also override some of the settings for your ClientApp and ServerApp defined in pyproject.toml. For example:
# Runs for 10 rounds and sampling 20% of the clients in each round
flwr run . --run-config "num-server-rounds=10 fraction-fit=0.2"
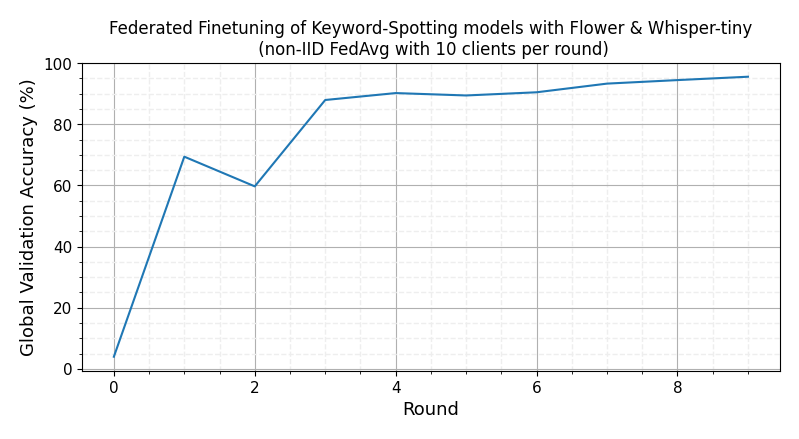
With just 5 FL rounds, the global model should be reaching ~97% validation accuracy. A test accuracy of 96% can be reached with 10 rounds of FL training using the default hyperparameters. On an RTX 3090Ti, each round takes ~40-50s depending on the amount of data the clients selected in a round have.
Run on GPU with central evaluation activated and for 10 rounds by passing --run-config "central-eval=true num-server-rounds=10" to your flwr run command.
[!TIP] If you find this federated setup not that challenging, try reducing the sizes of the groups created by the
GroupedNaturalIdPartitioner. That will increase the number of individual clients/nodes in the federation.
Run with the Deployment Engine
[!NOTE] The steps here outline the very few changes you need to make to the code provided in this example to run with the Deployment Engine instead of with the Simulation Engine. For a beginners guide on how the Deployment Engine works, please check the Run Flower with the Deployment Engine guide. That guide will introduce how to enable secure TLS and node authentication.
Running the exact same FL pipeline as in the simulation setting can be done without requiring any change to the ServerApp design. For the ClientApp we need to slightly adjust the logic that loads the dataset. While in simulations we want to dynamically make a Python process to behave like a particular client by loading its corresponding partition, in deployment mode we want the same client process (linked to a single SuperNode) to always use its own dataset that lives locally in the machine running the SuperNode.
An obvious first step would be to generate N data partitions and assing each to a different SuperNode. Let’s start with this step by means of the preprocess.py script. These are the steps we’ll follow:
Extract and save two partitions from the dataset. Each will be assigned to a different
SuperNode.Modify the
trainfunction inclient_app.pyso it directly loads the partition specified when launching theSuperNode.Copy the generate partition to the machine where the
SuperNodeis going to be executed.
1. Save a data partition
Run twice the following command, each time indicating a different partition id. Each time you run it a directory in the form partition_<id> will be created.
python preprocess.py --partition-id=5
2. Adjust client_fn
Rename the partition-id key with something more meaningful such as local-dataset in file whisper_example/client_app.py and replace the call to load_data with load_data_from_disk. This will make your ClientApp use the dataset you point your SuperNode to when launching it:
from whisper_example.dataset import load_data_from_disk

@app.train()
def train(msg: Message, context: Context):

    # ...
    # partition_id = context.node_config["partition-id"] # disable
    local_data = context.node_config["local-data"]  # new line

    # keep the same

    # replace the `load_data` lines with this
    partition = load_data_from_disk(local_data)
3. Make data available to the SuperNode
You will need to copy the generated directory in step 1 to the machine that will run the SuperNode. You can use, for example, the scp in order to do that.
With steps 1-3 completed, you are ready to run Federated Whisper finetuning with Flower’s Deployment Eninge. To connect a SuperNode to an existing federation (i.e. a running SuperLink) you’d do it like this assuming all the python dependencies (i.e. flwr, transformers, torch are installed – see pyproject.toml) in the Python environment of the machine where you are launching the SuperNode from:
flower-supernode --superlink="<SUPERLINK-IP>:9092" \
                 --node-config="local-data='<path/to/local/partition>'"
4. Run your whipser app
First, ensure you have a SuperLink connection defined in your Flower Configuration file. You can locate this file via flwr config list. Open it and create a new connection if you don’t have it already. For example:
[superlink.remote]
address = '127.0.0.1:9093' # IP:9093 of your superlink (assumed localhost superlink)
insecure = true # Check the documentation to setup with SSL
Once your SuperNodes are connected to the SuperLink, start the run via flwr run, but this time point it to the remote connection:
flwr run . remote
Federated Finetuning on Raspberry Pi
To launch a Flower SuperNode on a Raspberry Pi you’d typically follow the same steps you do on any other machine you’d like to connect to a federation.
First, ensure your Rasberry Pi has been setup correctly. You’ll need either a Rasbperry Pi 4 or 5. Using the code as-is, RAM usage on the Raspberry Pi does not exceed 1.5GB. Note that unlike in the previous sections of this example, clients for Raspberry Pi work better when using PyTorch 1.13.1 (or earlier versions to PyTorch 2.0 in general).
[!TIP] Follow the
Setup your Pisection in the examples/embedded-devices example to set it up if you haven’t done so already.
Second, generate and copy the a single data partition to your raspbery pi. Do so from your development machine (e.g. your laptop) as shown earlier in the Run with the Deployment Engine section.
Finally, assuming you have a SuperLink running on a machine (e.g. your laptop) and which can be reached by your Raspberry Pi (e.g. because they are in the same network), launch the SuperNode as shown earlier:
flower-supernode --superlink="<SUPERLINK-IP>:9092" \
                 --node-config="local-data='<path/to/local/partition>'"