Run Flower on Red Hat OpenShift
In this guide, you will learn how to create, deploy, and run a Flower app on the Red Hat OpenShift (RHOS) application platform. The platform will be hosted in AWS and we will follow the steps to install the cluster on installer-provisioned infrastructure using the Red Hat OpenShift Service on AWS.
Login to Red Hat OpenShift Console
Start by logging in to your Red Hat Hybrid Cloud Console and click on OpenShift link in the Red Hat
OpenShift card.
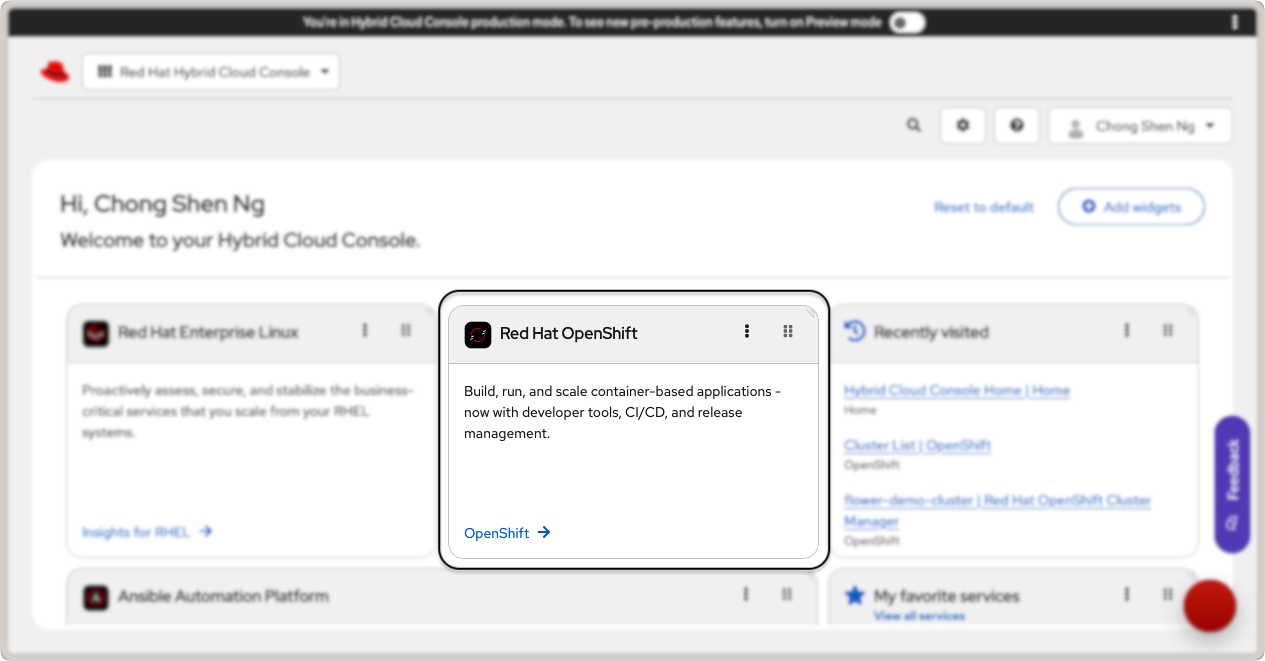
Red Hat OpenShift link in the cloud console.
This will take you to the OpenShift console. Under Overview, look for the Red Hat
OpenShift Service on AWS (ROSA) card and click on Create Cluster. You will be
taken to the page to setup a Red Hat OpenShift service on AWS. There are two
pre-requisites that you have to fulfill before you can create a cluster:
AWS Pre-requisites - Sets up your AWS account for deploying ROSA.
ROSA Pre-requisites - Installs the ROSA CLI tool on your system and login to your Red Hat account.
Complete AWS Pre-requisites
Follow the steps required to fulfill the pre-requisites for AWS to create and manage a Red Hat OpenShift cluster:
Enable RHOS service on AWS (ROSA) in your AWS account.
Ensure that you have sufficient service quotas for ROSA.
Create a service-linked role for Elastic Load Balancing. This should be automatically created for you if not present.
Link your AWS and Red Hat account.
Create AWS Identity and Access Management (IAM) roles. You will need to create an IAM user with these required permissions:
AmazonEC2FullAccessAWSCloudFormationFullAccessIAMFullAccessServiceQuotasReadOnlyAccess
For more details, refer to the RHOS getting started guide from your AWS console.
Complete ROSA Pre-requisites
Follow the steps shown in the section to download and install the ROSA CLI tool.
Next, install the aws CLI tool for your system. You can alternatively run it
with Docker using the command:
docker run --rm -it --volume ~/.aws:/root/.aws public.ecr.aws/aws-cli/aws-cli
The --volume ~/.aws:/root/.aws option mounts your AWS credentials to the Docker
container. Next, run the following to configure the AWS CLI tool and provide your AWS
credentials for the IAM user you created earlier:
➜ aws configure
AWS Access Key ID [None]: [...]
AWS Secret Access Key [None]: [...]
Default region name [None]: [...]  # your region
Default output format [None]: table  # the recommended output format
Download and install the ROSA CLI tool by following the instructions for your operating system. Once you have installed the ROSA CLI tool, login with your Red Hat account:
➜ rosa login --use-auth-code
I: You will now be redirected to Red Hat SSO login
I: Token received successfully
I: Logged in as '[...]' on 'https://api.openshift.com'
I: To switch accounts, logout from https://sso.redhat.com and run `rosa logout` before attempting to login again
If you are already logged into your Red Hat account on your browser, you will be redirected back to your terminal.
Then, create the necessary account-wide roles and policies:
➜ rosa create account-roles --mode auto
Finally, create a Virtual Private Network (VPC) for your cluster:
➜ rosa create network
...
INFO[0177] Stack rosa-network-stack-[...] created
With the AWS and ROSA pre-requisites completed, you are now ready to deploy a cluster.
Create a Red Hat OpenShift Cluster on AWS
There are three ways to create the cluster: via rosa CLI, web interface, or with
Terraform. For this guide, we will use the web interface. Click on the Create with web
interface button in the Deploy with web interface card:
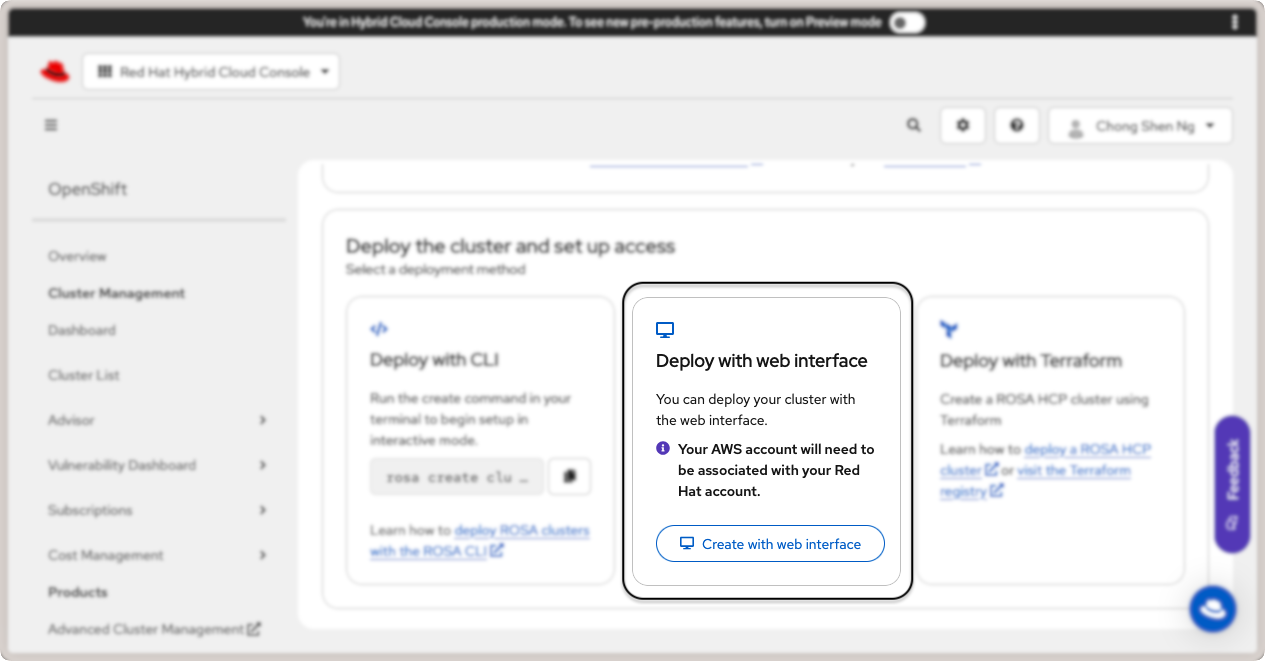
Deploy Red Hat OpenShift cluster with web interface.
You will be taken to a series of steps to create a ROSA cluster. In the following, some key steps are highlighted and we recommend that you follow the official guide in the Red Hat Cloud Console for more details.
Define Control Plane - Select the ROSA hosted architecture and click on
Next.Accounts and Roles - Ensure the infrastructure and billing account details are correct and click
Next.Cluster settings
Details - Specify
flower-demo-clusteras theCluster name. For this guide, select version4.18.22(you may select a newer version that suits your requirements). Select the AWS region appropriate for your AWS account.Machine Pool - Select an EC2 compute node instance type that is available in your region. In this guide, we use the
eu-north-1region, and therefore selectedm6i.2xlarge - 8 vCPU 32 GiB RAM. Enable autoscaling and set the minimum node count to 2 and maximum to 4. This allows the cluster to scale up when you deploy the OpenShift platform and OpenShift AI in the same cluster.
Networking
Configuration - Under "Cluster privacy", select
publicand leave other values as defaults.CIDR ranges - Leave the default CIDR ranges as is.
Cluster roles and policies - Follow the steps to create a new OIDC config ID.
Cluster updates - Leave the default settings as is to "Recurring updates".
Finally, review the cluster details and click
Create cluster.
This will start the cluster creation process and may take several minutes to complete. You will be able to monitor the installation status of the control plane and machine pools in the "Overview" tab.
Once your cluster is created, you will be prompted to create an identity provider to
access the cluster. Click on the Create identity provider link and follow the steps
for your preferred OIDC provider. Grant the user in your OIDC provider the
cluster-admin rights so that you can add apps from the OperatorHub later. To do so,
go to Access control, Cluster Roles and Access tab, and click on Add user.
Enter the user ID from your OIDC provider and save the changes.
Your cluster is now ready. To view the cluster details, click on the Cluster List
link in the left sidebar. Click on your cluster name (flower-demo-cluster) to view
the cluster details:
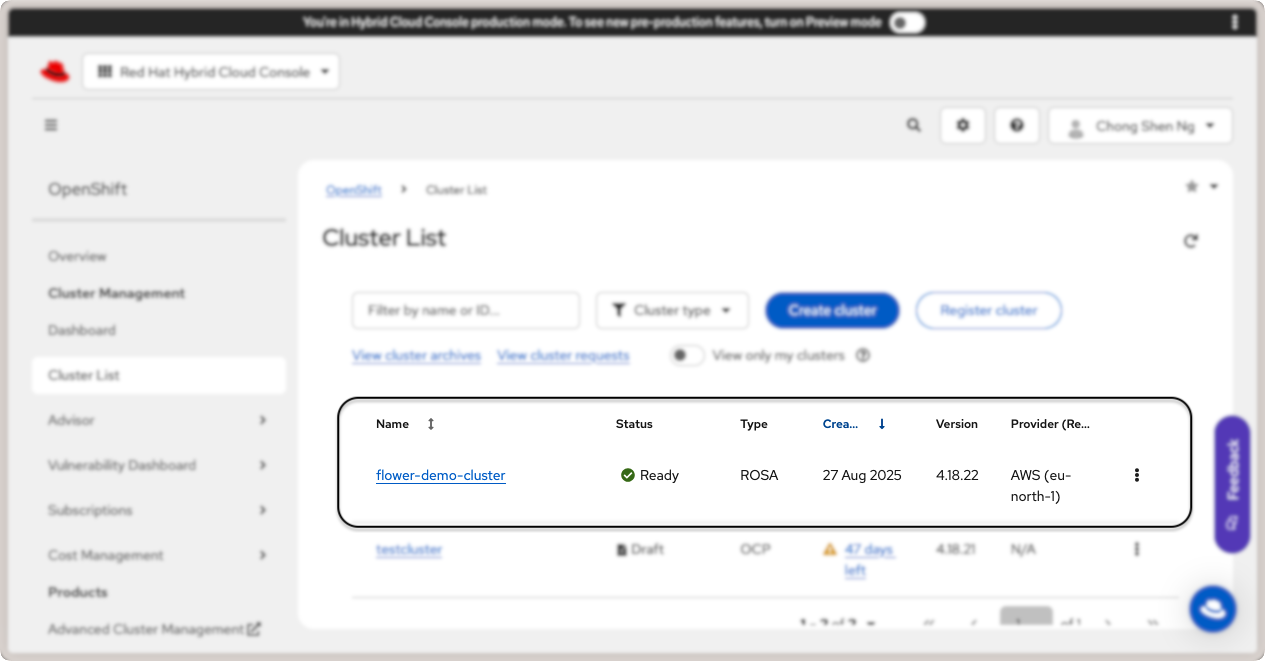
Red Hat OpenShift cluster details.
To access the OpenShift web console, click on the Open console link in the top
right. You will be redirected to your OIDC provider to login. Once logged in, you will
be taken to the OpenShift web console:
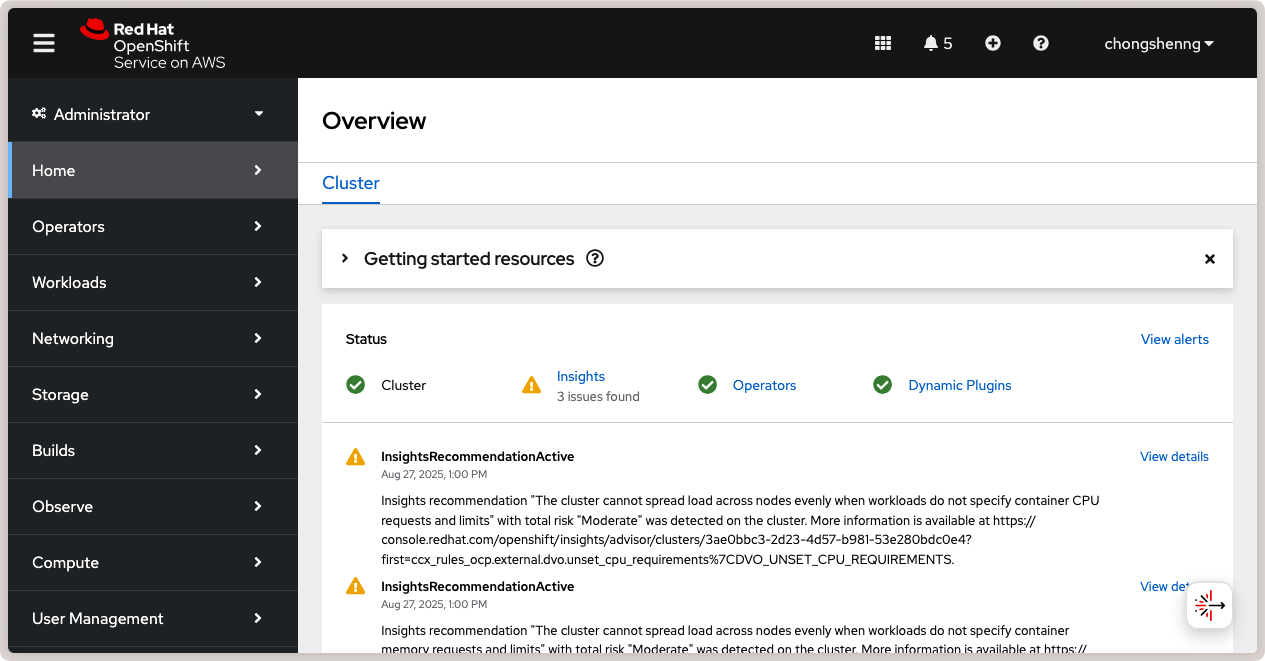
Red Hat OpenShift web console.
Congratulations! You now have a running Red Hat OpenShift cluster on AWS. Now, let's walk through how to deploy Flower on your OpenShift cluster.
Deploy Flower SuperLink and SuperNodes on OpenShift
With the OpenShift cluster active, we can now deploy SuperLink and SuperNode pods and run a federated workload. In this guide, we will deploy four pods: 1x SuperLink, 2x SuperNodes, and 1x service pod to route the traffic to the designated ports in the SuperLink.
First, we need to create an OpenShift project which is equivalent of a Kubernetes
namespace. We will then deploy the SuperLink and SuperNode pods in this project.
Navigate to Home > Projects and click on the Create Project button on the
right. Set flower-openshift-demo as the project name.
Next, we will add pods. Navigate to Workloads > Pods and click on the Create
Pod button on the right. There are several ways to create a pod, such as using YAML or
JSON definitions. For this guide, we will use the YAML definition. Copy and paste the
following YAML definition for the SuperLink pod. This manifest is adapted from our
tutorial on how to deploy Flower in GCP.
superlink-deployment.yaml
apiVersion: apps/v1
kind: Deployment
metadata:
  name: superlink
  namespace: flower-openshift-demo # The project name from above
spec:
  replicas: 1
  selector:
    matchLabels:
      app: superlink
  template:
    metadata:
      labels:
        app: superlink
    spec:
      # Ensures mounted volumes are writable by the pod's non-root user on OpenShift
      securityContext:
        runAsNonRoot: true
      containers:
        - name: superlink
          image: flwr/superlink:1.33.0
          args:
            - "--insecure"
          ports: # which ports to expose/available
            - containerPort: 9092
              name: fleet
            - containerPort: 9093
              name: control
          volumeMounts:
            - name: cache-volume
              mountPath: /app/.cache
            - name: tmp-volume
              mountPath: /var/tmp
            - name: fab-volume
              mountPath: /app/.flwr
            - name: config-volume
              mountPath: /app/.config
      volumes:
        - name: cache-volume
          emptyDir:
            sizeLimit: 50Mi
        - name: tmp-volume
          emptyDir:
            sizeLimit: 50Mi
        - name: fab-volume
          emptyDir:
            sizeLimit: 50Mi
        - name: config-volume
          emptyDir:
            sizeLimit: 50Mi
After the SuperLink pod is created, add the service pod following the steps to create a pod and insert the following YAML definition:
superlink-service.yaml
apiVersion: v1
kind: Service
metadata:
  name: superlink-service
  namespace: flower-openshift-demo
spec:
  selector:
    app: superlink
  ports:  # like a dynamic IP routing table/mapping that routes traffic to the designated ports
  - protocol: TCP
    port: 9092   # Port for SuperNode connection
    targetPort: fleet  # the SuperLink container port
    name: superlink-fleetapi
  - protocol: TCP
    port: 9093   # Port for Flower app submission
    targetPort: control  # the SuperLink container port
    name: superlink-controlapi
  type: LoadBalancer  # balances workload, makes the service publicly available
Finally, spin up two SuperNode pods with the following YAML definitions:
supernode-1-deployment.yaml
apiVersion: apps/v1
kind: Deployment
metadata:
  name: supernode-1
  namespace: flower-openshift-demo # The project name from above
spec:
  replicas: 1
  selector:
    matchLabels:
      app: supernode-1
  template:
    metadata:
      labels:
        app: supernode-1
    spec:
      # Ensures mounted volumes are writable by the pod's non-root user on OpenShift
      securityContext:
        runAsNonRoot: true
      containers:
      - name: supernode
        image: flwr/supernode:1.33.0
        args:
          - "--insecure"
          - "--superlink"
          - "superlink-service:9092"
          - "--clientappio-api-address"
          - "0.0.0.0:9094"
        ports:
        - containerPort: 9094
        volumeMounts:
        - name: cache-volume
          mountPath: /app/.cache
        - name: tmp-volume
          mountPath: /var/tmp
        - name: fab-volume
          mountPath: /app/.flwr
        - name: config-volume
          mountPath: /app/.config
      volumes:
      - name: cache-volume
        emptyDir:
          sizeLimit: 50Mi
      - name: tmp-volume
        emptyDir:
          sizeLimit: 50Mi
      - name: fab-volume
        emptyDir:
          sizeLimit: 50Mi
      - name: config-volume
        emptyDir:
          sizeLimit: 50Mi
supernode-2-deployment.yaml
apiVersion: apps/v1
kind: Deployment
metadata:
  name: supernode-2
  namespace: flower-openshift-demo # The project name from above
spec:
  replicas: 1
  selector:
    matchLabels:
      app: supernode-2
  template:
    metadata:
      labels:
        app: supernode-2
    spec:
      # Ensures mounted volumes are writable by the pod's non-root user on OpenShift
      securityContext:
        runAsNonRoot: true
      containers:
      - name: supernode
        image: flwr/supernode:1.33.0
        args:
          - "--insecure"
          - "--superlink"
          - "superlink-service:9092"
          - "--clientappio-api-address"
          - "0.0.0.0:9094"
        ports:
        - containerPort: 9094
        volumeMounts:
        - name: cache-volume
          mountPath: /app/.cache
        - name: tmp-volume
          mountPath: /var/tmp
        - name: fab-volume
          mountPath: /app/.flwr
        - name: config-volume
          mountPath: /app/.config
      volumes:
      - name: cache-volume
        emptyDir:
          sizeLimit: 50Mi
      - name: tmp-volume
        emptyDir:
          sizeLimit: 50Mi
      - name: fab-volume
        emptyDir:
          sizeLimit: 50Mi
      - name: config-volume
        emptyDir:
          sizeLimit: 50Mi
To view the status of pods that were just deployed, click on the Workloads link in
the left panel. You should be able to see three Flower pods in the "Running" status as
shown in the screenshot below:
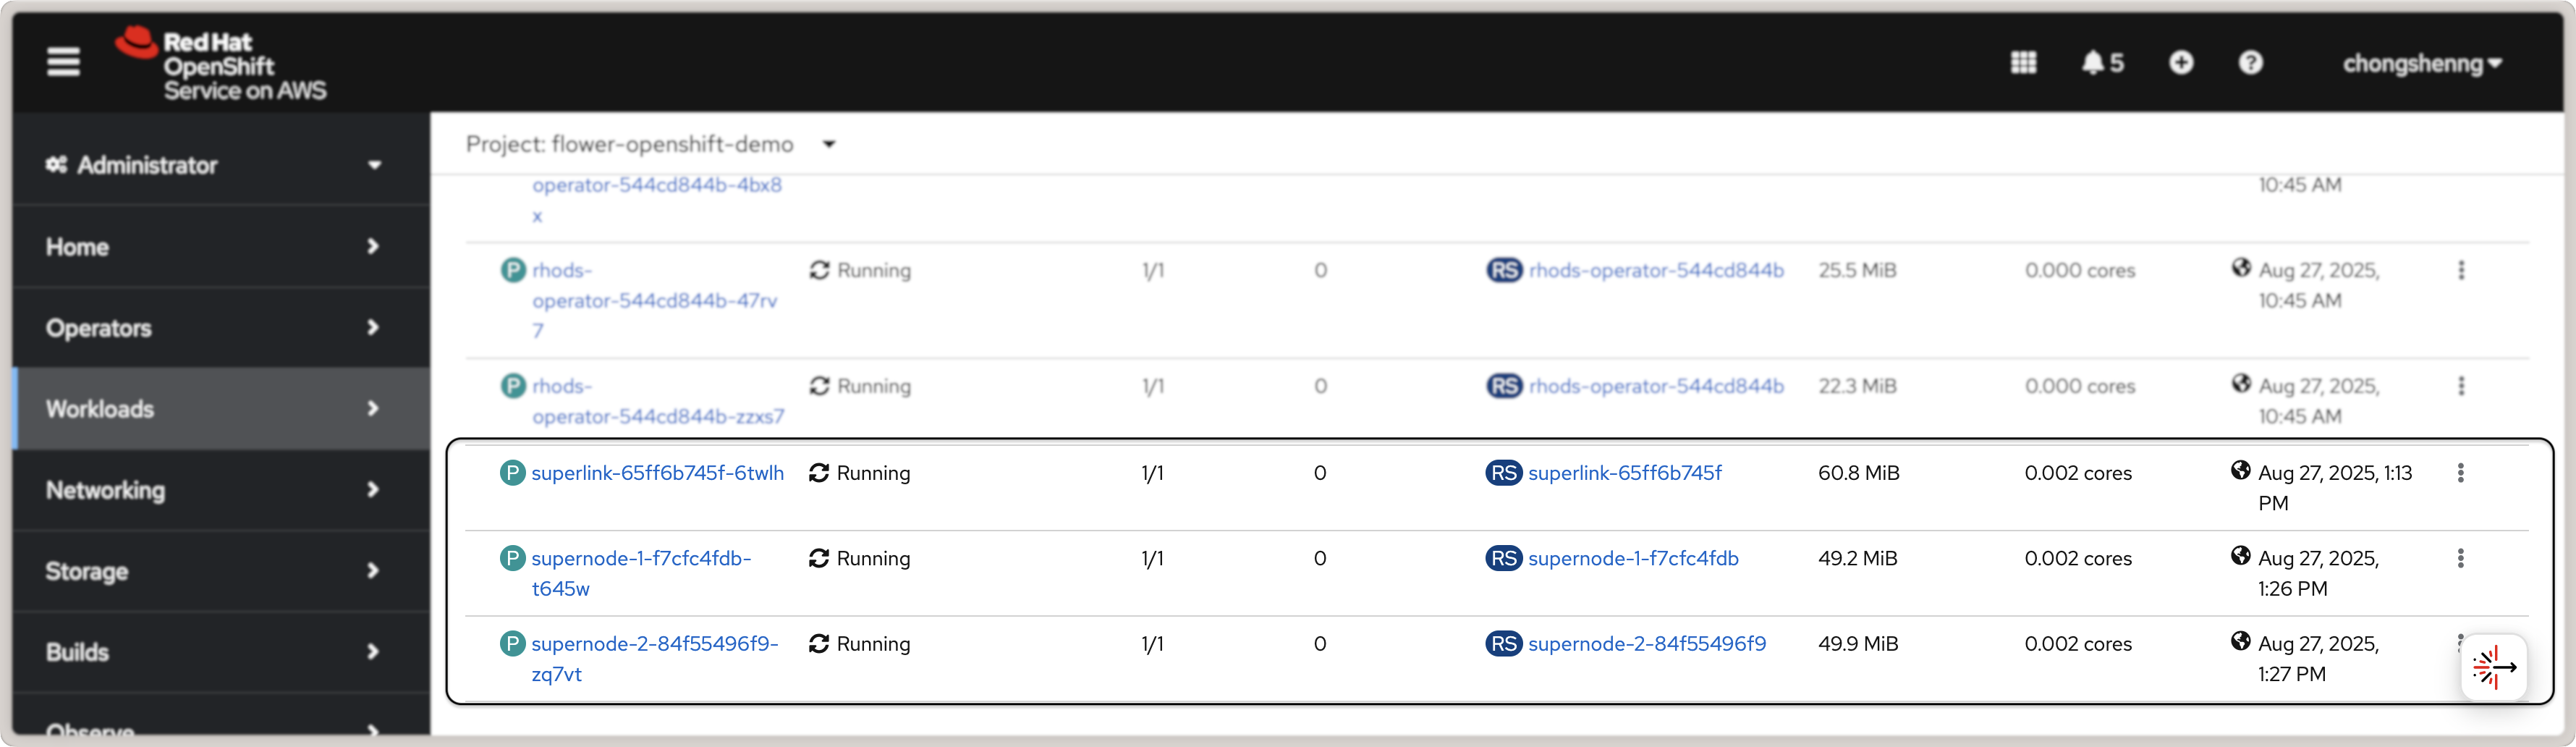
Flower SuperLink and SuperNode pods in Red Hat OpenShift.
Click on the SuperLink pod to view the pod details and click on the Logs tab. You
should be able to view the SuperLink logs showing two connected SuperNodes.
Tip
To shut down the pods, navigate to Workloads > Deployments, select the
deployed pods, and click on Edit Pod Count to set the replica count to 0. Now,
you can delete the pods by selecting them and clicking on the Delete Deployment
button.
Deploy Red Hat OpenShift AI
To interface with the deployed SuperLink and SuperNode in the OpenShift cluster, we want to make use of OpenShift AI workbench. So, we need to enable this Operator in the OpenShift cluster.
First, ensure that the Red Hat OpenShift AI is enabled via the Red Hat OpenShift
console. You may enable a free trial if you do not have a subscription. Navigate to
Operators > OperatorHub and search for Red Hat OpenShift AI. Click on the
Red Hat OpenShift AI card and then click on the Install button. Alternatively,
install the OpenShift AI Operator via the OpenShift CLI tool following the official
instructions here.
Once the installation is complete, you should see a green check mark under the
Status column for the Red Hat OpenShift AI Operator in the Installed
Operators tab:
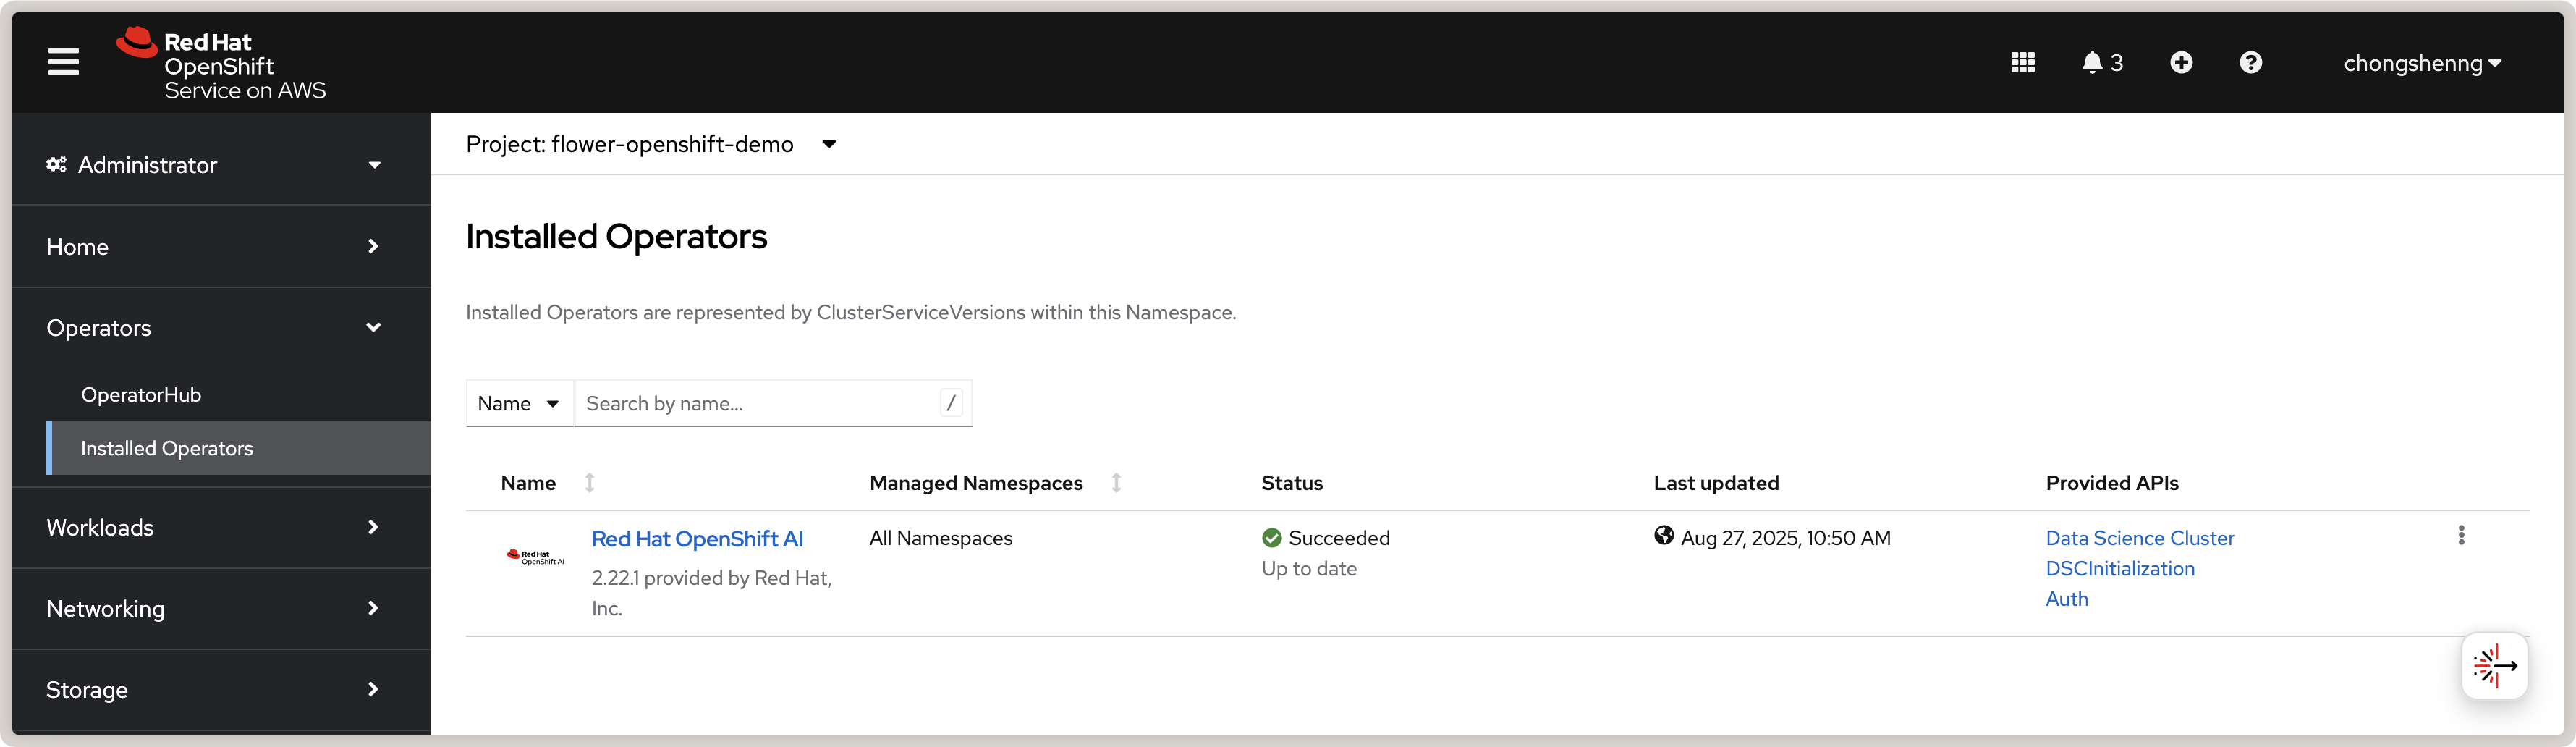
Red Hat OpenShift AI Operator in OpenShift.
Install Data Science Cluster
After installing the Operator, we need to install the DataScienceCluster using the
web console. Follow the official steps in this link.
It is also recommended to disable KServe dependencies
since we are not serving ML models for inference. In the Installed Operators tab,
click on Red Hat OpenShift AI, navigate to the Data Science Cluster tab, and
click on Create DataScienceCluster. Select the YAML view of the configuration and
paste the following YAML definition:
rhosai-datasciencecluster.yaml
apiVersion: datasciencecluster.opendatahub.io/v1
kind: DataScienceCluster
metadata:
  name: default-dsc
  labels:
    app.kubernetes.io/created-by: rhods-operator
    app.kubernetes.io/instance: default-dsc
    app.kubernetes.io/managed-by: kustomize
    app.kubernetes.io/name: datasciencecluster
    app.kubernetes.io/part-of: rhods-operator
spec:
  components:
    codeflare:
      managementState: Removed
    kserve:
      managementState: Removed
    modelregistry:
      managementState: Removed
    feastoperator:
      managementState: Removed
    trustyai:
      managementState: Removed
    ray:
      managementState: Removed
    kueue:
      managementState: Removed
    workbenches:
      workbenchNamespace: rhods-notebooks
      managementState: Managed
    dashboard:
      managementState: Managed
    modelmeshserving:
      managementState: Removed
    llamastackoperator:
      managementState: Removed
    datasciencepipelines:
      managementState: Removed
    trainingoperator:
      managementState: Removed
Click on Create to create the Data Science Cluster. If successful, you should see a
default-dsc instance in the Data Science Clusters tab with a green check mark:

View of a successfully created Red Hat OpenShift AI Data Science Cluster.
Once the above is complete, you will be able to launch OpenShift AI by clicking on the
grid icon on the top right of the OpenShift console and clicking on the Red Hat
OpenShift AI link:
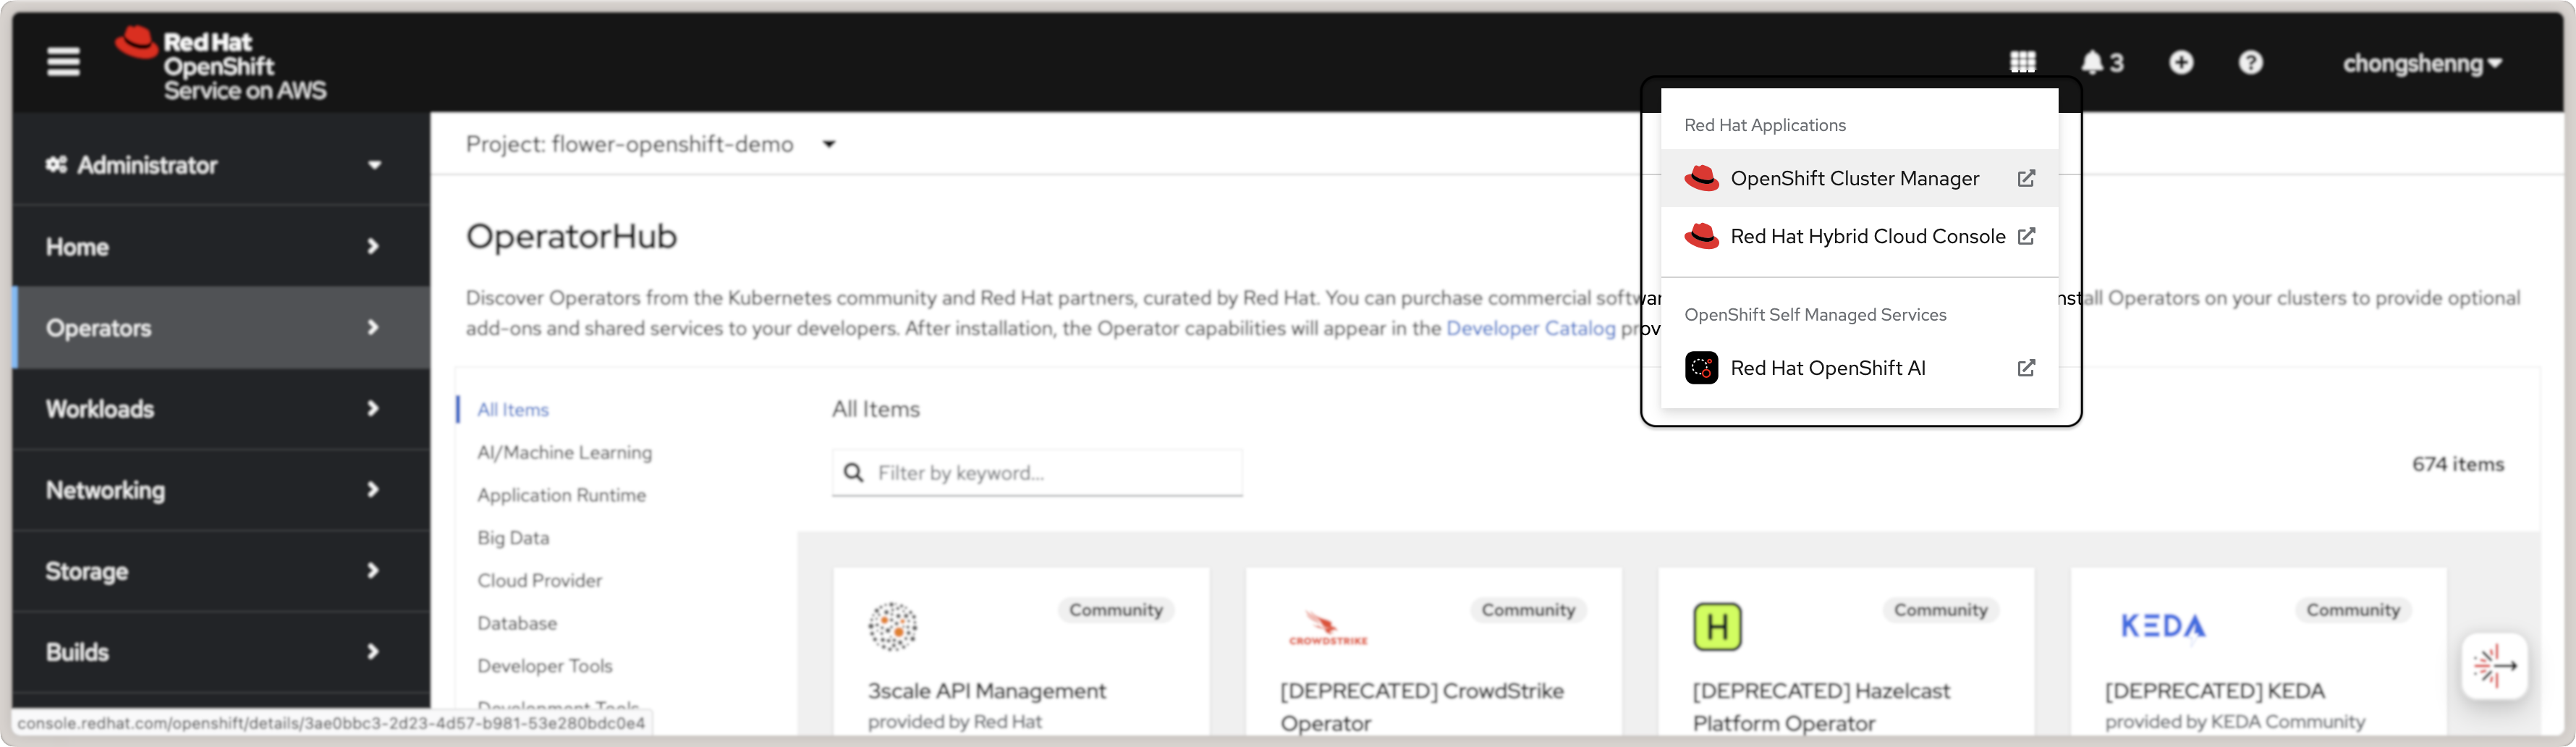
Launch Red Hat OpenShift AI from OpenShift console.
Follow the instructions when prompted to Log in with OpenShift. After logging in,
you will be taken to the OpenShift AI dashboard.
Create a Custom OpenShift AI Image with Flower
In OpenShift AI, you will be building and running your Flower app in a workbench, which is a Jupyter notebook environment. However, the default OpenShift AI workbench image does not come with Flower installed. Therefore, we will first create a custom OpenShift AI image with Flower pre-installed. This custom image will then be used to create a workbench. The steps in this section are adapted from the official Red Hat OpenShift AI guide for creating a custom workbench image.
Pre-requisites: Given that Red Hat OpenShift AI needs to be able to pull from a
container registry, you will need to create an account on quay.io if you do not have
one already. Then, create a new repository, e.g., flowerlabs/demo, and make it
public. You will also need to install the Docker CLI tool on your system. Then, login to your quay.io
account using the command:
docker login quay.io
Now, we select a base image for our custom OpenShift AI image. In the Red Hat OpenShift
console, go to Builds > ImageStreams. You can find the default workbench images
for the redhat-ods-applications project. Select the s2i-minimal-notebook and
choose the image tag that you want to use and copy the sha256 identifier. In this
guide, we will use the 2025.1 tag.
Next, in your machine, create a Dockerfile with the following contents:
Dockerfile
FROM quay.io/modh/odh-workbench-jupyter-minimal-cpu-py311-ubi9@sha256:0ea737f6c626d5d01b44fc8c6537a193ad45c378aed9ff98b209968dff418075

USER 1001

RUN pip install flwr==1.33.0
Build and push the container image to your public repository on quay.io:
docker build -t quay.io/flowerlabs/demo/flwr-rhos:0.0.1 . && docker push quay.io/flowerlabs/demo/flwr-rhos:0.0.1
Once the image is pushed, we will configure OpenShift AI to load this custom workbench
image. In the OpenShift AI dashboard, go to Settings > Workbench images and
click on Import new image. Set the Image location to your custom image (e.g.,
quay.io/flowerlabs/demo/flwr-rhos:0.0.1@sha256[...]) and give it a name (e.g.,
flwr-rhos-image). Take note of the resource name as you will need it in the next
section when creating your workbench. Then, click on Import to import the image. If
successful, you should see your custom image in the list of workbench images:
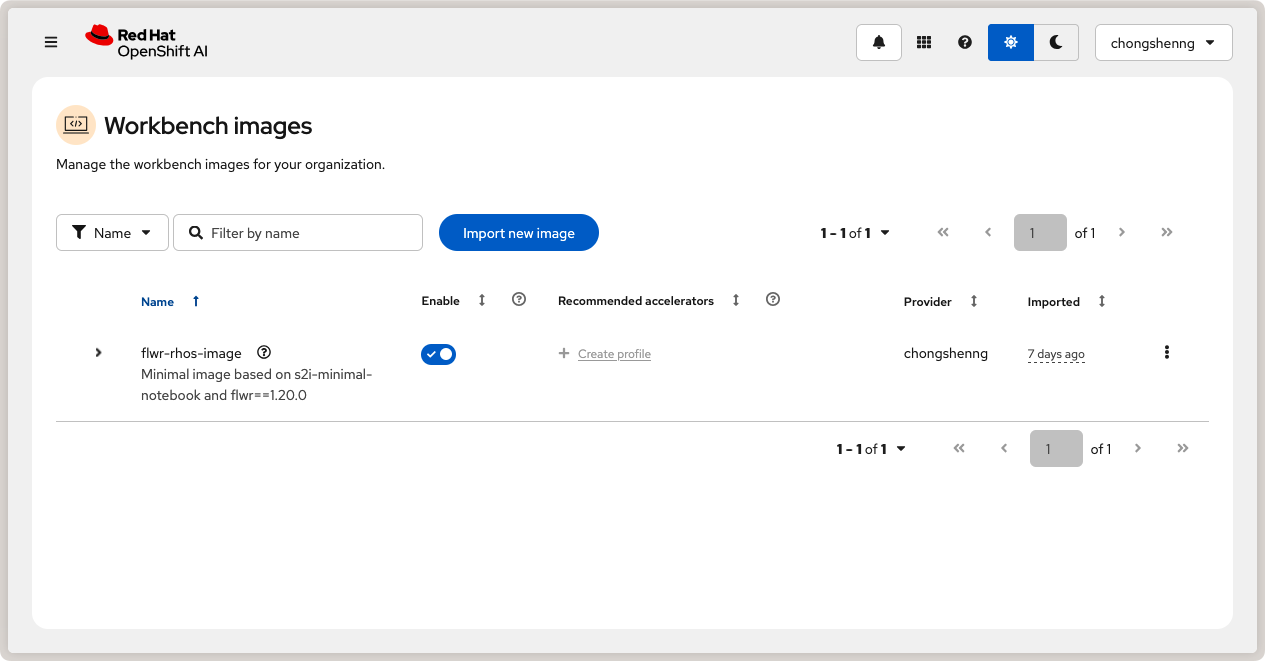
Custom OpenShift AI workbench image with Flower.
Create a Data Science Project
Now we are ready to create a Data Science project in OpenShift AI and create a workbench using the custom image we just created from the previous section.
On the left sidebar, click on Home, navigate to the Data Science Projects
section, and click on the Create project button. Give your project a name, e.g.,
flower-openshift-demo and - if you like, a description. Then, click Create.
Click on your created project to open it.
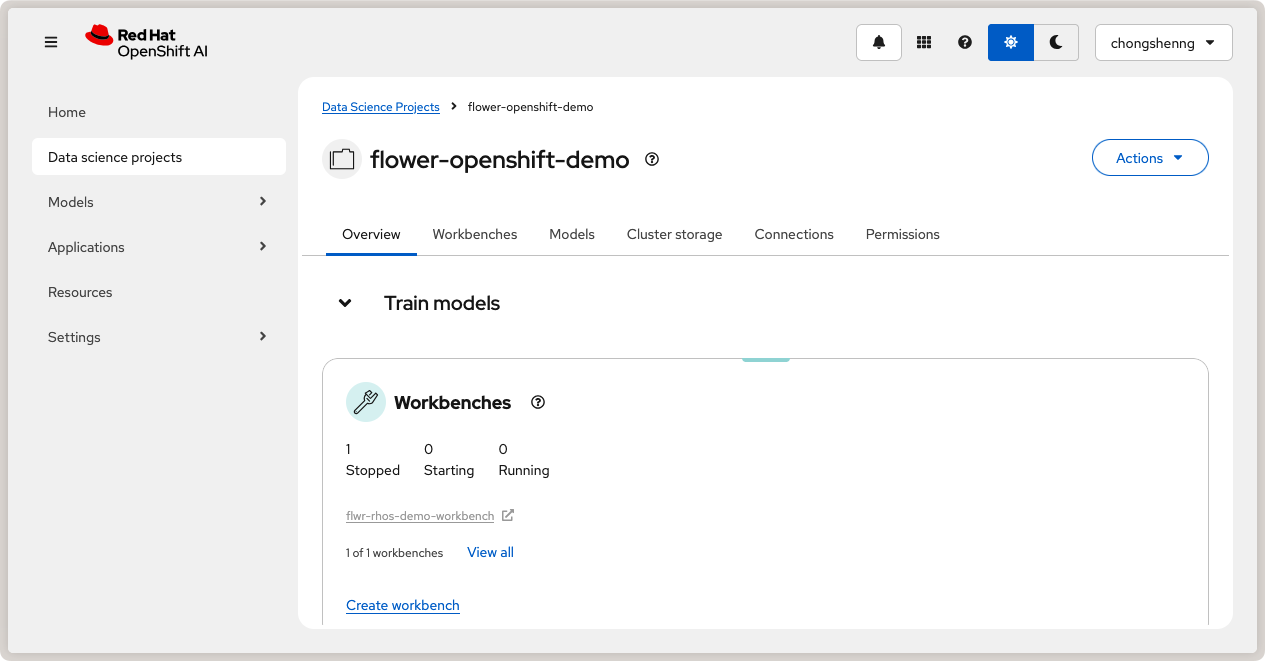
Data Science project in Red Hat OpenShift AI.
Navigate to the Workbenches tab and click on Create workbench to create a new
workbench. Under "Name and description", provide a name for your workbench, e.g.
flwr-rhos-demo-workbench. Under Workbench image > Image selection, select
the name of the image that you provided earlier (i.e., flwr-rhos-image). Choose a
medium container size and leave other settings as default. Finally, click on Create
Workbench. The status of your workbench should switch to Running after a few
minutes:
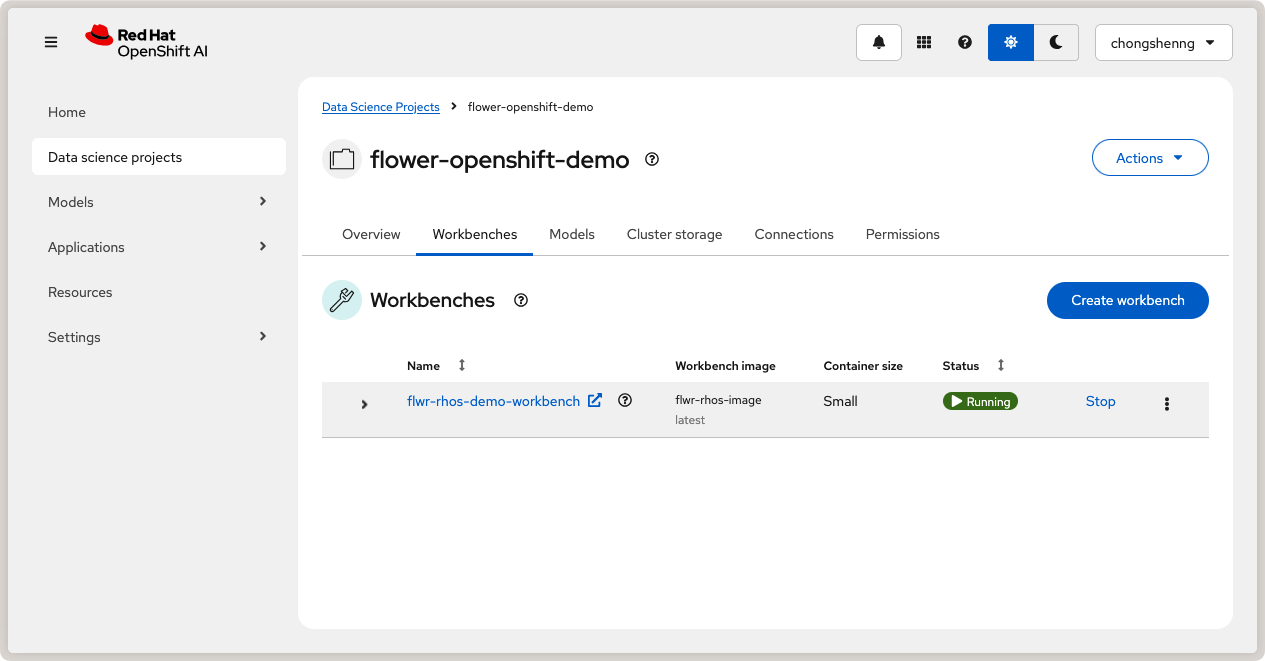
Running workbench in Red Hat OpenShift AI.
Now, click on your workbench and launch the JupyterLab environment.
Run the Flower App in OpenShift AI
With a running workbench and deployed SuperLink and SuperNode pods in your OpenShift
cluster, you are now ready to run a Flower app! In the JupyterLab environment of your
workbench, let's verify Flower is installed correctly and working as expected: open a
new terminal and run flwr --version to check the Flower version:
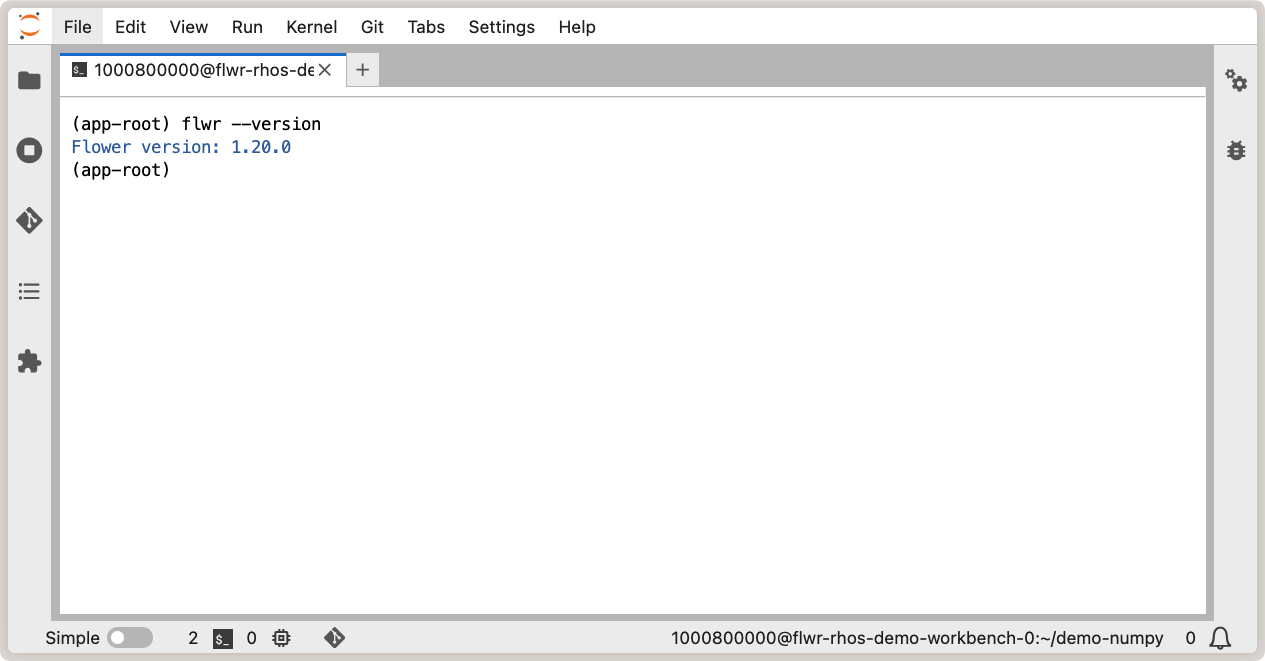
Verify Flower installation in OpenShift AI workbench.
With Flower running correctly, you can now follow the usual steps of using flwr new
to create a new Flower app from a template, and flwr run to run your Flower app on
the deployed SuperLink and SuperNode pods. Given that we deployed the OpenShift AI
instance in the same namespace (flower-openshift-demo) as the SuperLink in the
OpenShift cluster, the only change you need to make is to define a new SuperLink
connection in the Flower Configuration file:
Run
flwr config listto locate the Flower configuration file on your machine and view available SuperLink connections.$ flwr config list Flower Config file: /path/to/.flwr/config.toml SuperLink connections: supergrid local (default)
Open the Flower Configuration file (
config.toml) and add a new SuperLink connection at the end:config.toml¶[superlink.remote] address = "superlink-service:9093" # use the service name created earlier insecure = true
And finally, run your Flower app as usual with flwr run:
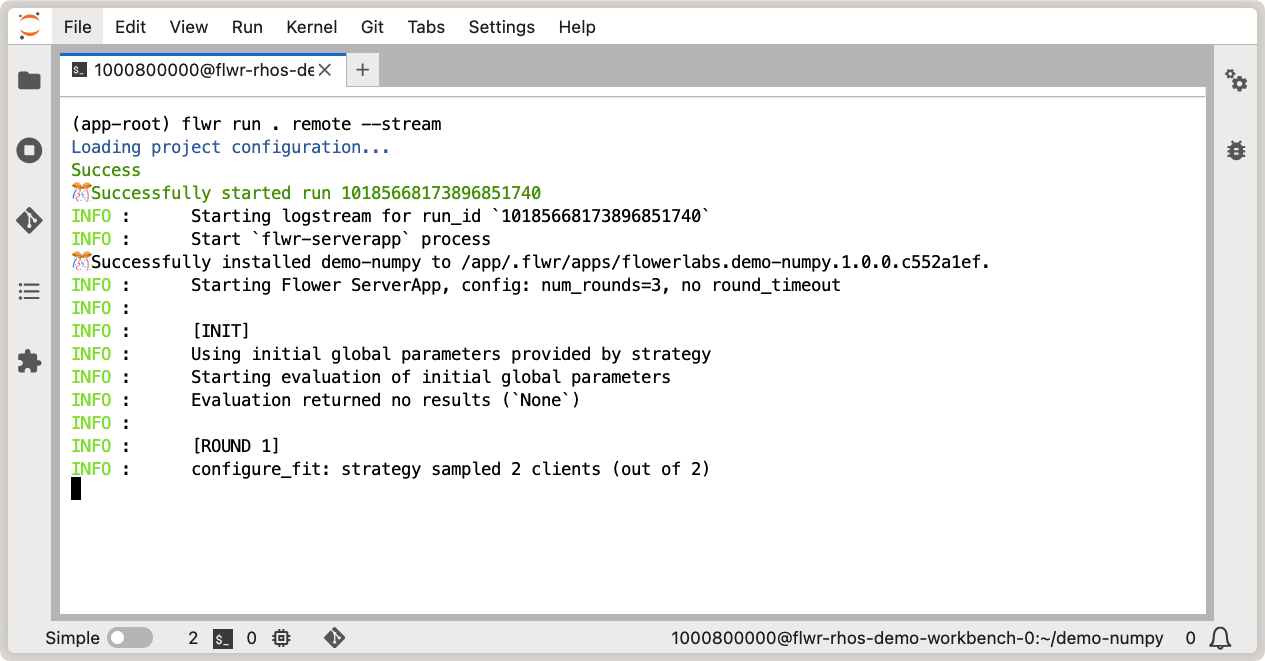
Running Flower app in OpenShift AI workbench.
You can also view the logs of the SuperLink pod in the OpenShift console. Navigate to
Workloads > Pods, click on the SuperLink pod, and then click on the Logs:
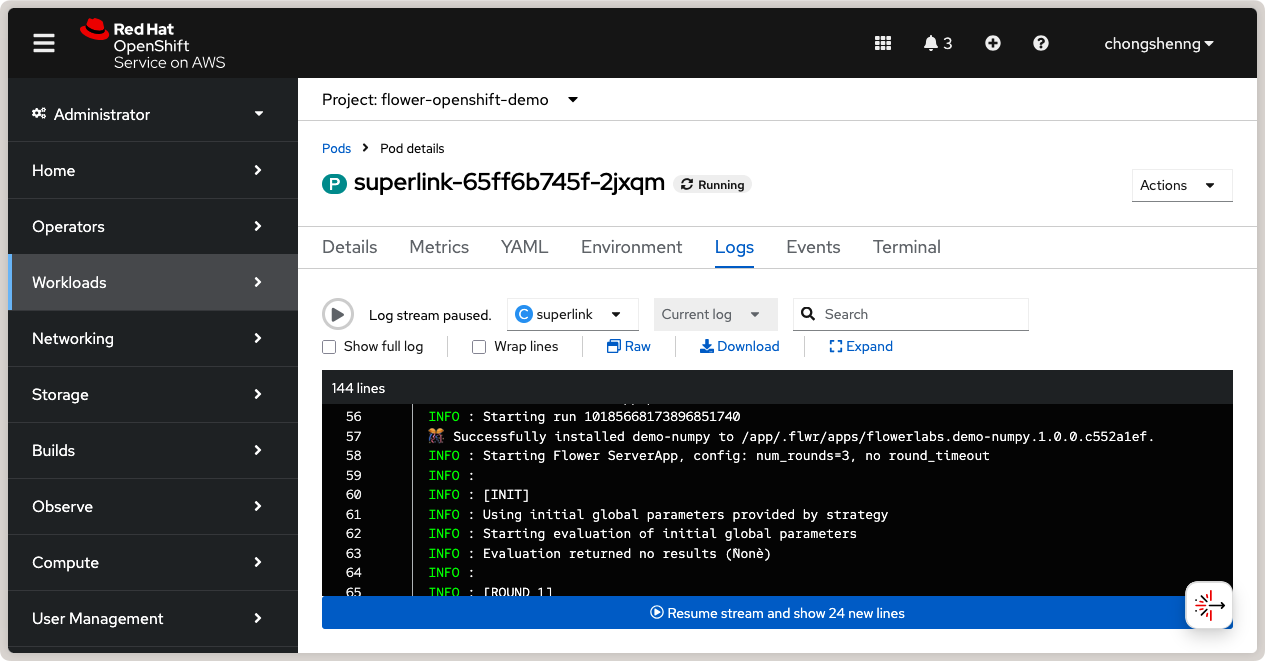
SuperLink logs showing connected SuperNodes and running Flower app.
Congratulations! You have successfully created, deployed, and run a Flower app on Red Hat OpenShift using the Red Hat OpenShift Service on AWS. You can explore running different Flower apps and federated workloads on your OpenShift cluster, for instance, with PyTorch. For further reading about deploying Flower with Docker and Kubernetes, check out our guides below:
To learn about running Flower on other cloud platforms, check out our guides below: